Replacing a failed electric roller shutter motor in Australia typically lands between $600 and $750 all-in. The motor itself costs around $350–$475, while licensed labour and the mandatory Certificate of Compliance add $250–$550. You can pocket the labour margin if you’re handy with wiring and ladders, yet most homeowners still call a qualified installer for safety and warranty peace of mind.
That slender tubular motor hidden inside the axle does the heavy lifting on every press of the switch. After tens of thousands of cycles, water ingress, power spikes or plain wear can leave it groaning, stuttering or refusing to budge. Put off the swap and you risk a jammed curtain that compromises security, chews up slats and robs your room of insulation and light control.
This guide cuts through the jargon: detailed cost breakdowns, motor-selection tips, a step-by-step DIY plan, hiring advice, maintenance tricks and answers to the questions technicians hear every week. Read on to keep your shutters rolling smoothly.
1. Warning Signs Your Roller Shutter Motor Needs Replacing
A sick roller shutter rarely dies without dropping a few hints first. Catching those early clues saves you the cost and hassle of an emergency call-out—or worse, an after-hours smash-repair when the curtain refuses to close. Before you lock in an electric roller shutter motor replacement, run through the checkpoints below.
Common symptoms you can’t ignore
- Shutter won’t budge, stops mid-travel or creeps only a few centimeters up or down
- Loud grinding, buzzing or rhythmic clicking from inside the head box
- Motor overheats and cuts out, then works again after cooling
- Noticeably slower or uneven movement compared with neighboring shutters
- Motor makes no noise at all
Quick troubleshooting checklist
- Confirm wall switch or remote batteries aren’t flat
- Inspect your switchboard for a blown fuse or tripped RCD
- Look for obstructions in the tracks or bent slats
- Check if other shutters operate normally to isolate the fault
When a simple repair—not a full replacement—will do
- Re-setting limit switches that have drifted
- Replacing a worn spring, bearing or control module
- 2. How Much Does Electric Roller Shutter Motor Replacement Cost in Australia?
The out-of-pocket figure depends on three things: the motor you choose, how tricky the install is, and the paperwork your sparky has to file. Use the ranges below as a realistic yardstick for budgeting an electric roller shutter motor replacement anywhere in Australia.
Price range for replacement motors (parts only)
- Entry-level 240 V tubular motors (≈10 Nm) for small bedroom windows: $220–$280
- Mid-range 20–40 Nm units that suit most Adelaide homes: $250–$450
- Heavy-duty 60–100 Nm drives for wide doors or shopfronts: $450–$1300
- Optional add-ons: remote receiver $140–$180, smart-home hub $220–$450, battery-backup kit $550–$750
Labour and electrical certification fees
Expect a standard metro job fee plus wiring charge of $300–$450. South Australian law then requires a licensed electrician to issue a Certificate of Compliance, typically $40–$80. Some contractors also bill $10–$20 to cart away the old motor.
Real-world cost scenarios
- 2.4 m wide bedroom shutter, like-for-like swap: Parts $280+ Labour $300 = $580
- Crank-handle conversion to electric: Motor $240 + Axle $90 (if needed, not all jobs do) + Switch $35 + Labour/CoC $325= $690
- 4 m commercial shopfront: Motor $550+ Two-person labour $550 = $1100
3. Selecting the Right Replacement Motor for Your Shutter
Pick the wrong motor and you’ll be back on the ladder in months—or worse, the shutter will never lift at all. Use the quick pointers below to match power, size and smarts to your curtain before you swipe the credit card. many companies will put in a cheaper, smaller, underperforming motor to get their price down. We do not, we use an upgraded motor size so that you are not replacing it quickly by burning it out just after the warranty finishes, making sure we know you will get many, many years past the warranty out of it.
Motor types and power ratings explained
- 240 V AC tubular (work-horse for mains-powered homes) – these motors come in various sizes, depending on the weight its lifting
- 12/24 V DC battery or solar kits for off-grid retrofits – a few choices to choose from here
- Torque is the headline figure. Residential windows usually need between a 10,15, 20, 25, 30, 40 Nm, wide doors up to 100 Nm. Higher torque means more lifting grunt but a slightly larger barrel.
Measuring torque and tube size accurately – we do this for you so call us on 83692266 to book
- Remove the pelmet; weigh the curtain or use the supplier’s size-to-weight chart.
- Measure axle radius in metres (0.02 m for a 40 mm oct tube).
- Plug into
Required Nm = (kg × radius) × 1.1for a 10 % safety margin. - Confirm the new motor’s crown and drive suit your 40 mm, 50 mm or 60 mm tube.
Popular brands and compatibility notes
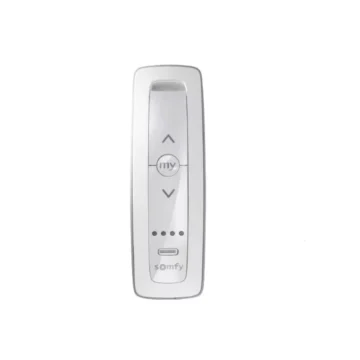
- Somfy: whisper-quiet, five-year warranty, plays nicely with Google Home.
- Alpha / OzRoll: solid mid-range, widespread Aussie spare parts.
- Simu / Dooya: budget option; check that remotes use the same frequency as your existing gear.
- There are lesser known and used brands that some people use to get your pricing down to sound cheap DONT use them.
Warranty and lifespan expectations
Expect 10–15 years or ≈20 000 cycles from a quality unit. DIY wiring, water ingress or oversizing void most warranties—so file invoices, seal the head box and keep load within spec.
4. DIY or Professional? Deciding the Best Route
Swapping a roller shutter motor isn’t rocket science, but it does mix ladders, tight spaces and 240 V cabling—a trio that can bite the unwary. Balance the dollars you’ll save against safety, warranty and compliance before you pop the pelmet. call us on 83692266 we do it all for you
Pros and cons of DIY replacement
- Save $200–$400 in labour
- Work to your own schedule
- Satisfaction of a hands-on fix
- Risk of 240 V electric shock
- Possible damage to gyprock or curtain
- No electrician sign-off = voided insurance, warranty
Safety and Australian electrical regulations
Any hard-wired connection must be completed or certified by a licensed electrician. SA fines top $40 000 for illegal electrical work, and insurers may decline claims after a DIY wiring mishap.
Tools, materials and skill level required
- Cordless drill & hex bits
- Multimeter, strippers, crimp connectors
- Ladder rated to your working height
- Confidence isolating mains and reading wiring diagrams
Scenarios where hiring a professional is wiser
- Second-storey or hard-to-reach shutters
- Group-controlled or smart-home networks
- Commercial or strata properties needing a Certificate of Compliance
- Curtain damage or bent guides alongside motor failure
5. Step-by-Step Guide to DIY Electric Roller Shutter Motor Replacement
Ready to roll up your sleeves? The sequence below assumes a mains-powered tubular motor in a standard head box. Work methodically, keep one hand on safety and photograph each stage so you can reverse your steps if needed.
Preparation and safety shut-down – remember each brand is different, so research the brand if your DIY
Isolate the circuit at the main board, tag it, then prove it dead with a multimeter. Lay a drop sheet on the sill, remove the pelmet cover and snap a phone photo of the existing wiring and limit-screw positions.
Removing the shutter curtain and axle
Lower the curtain halfway to relieve tension. Unclip the top slats or hinge pins from the axle drum. Support the tube with one hand while undoing the bearing brackets; lift the whole assembly clear. Note whether you have a 40 mm octagonal or 50 mm round tube—your new motor must match.
Disconnecting and testing the old motor
Label each conductor (Active, Neutral, Earth, Up, Down) before loosening the terminal block. If you’re curious, measure coil resistance—an infinity reading confirms a burnt winding. Remove the retaining screw, rotate slightly and slide the motor out of the tube.
Installing and wiring the new motor
Fit the correct crown and drive wheel to the replacement unit, then push it fully home until the spline locks. Re-seat the axle, tighten brackets and route the flex without crushing it. Connect wires: Brown-Active, Blue-Neutral, Green/Yellow-Earth; secure with crimp ferrules.
Setting limits, syncing remotes and final checks
Restore power. Hold the “up” button to run the shutter open, tweaking the up-limit screw until it stops flush with the head box. Repeat for “down” so the bottom bar just kisses the sill. Pair remotes, cycle the shutter three times, listen for smooth travel, then refit the pelmet and clean up.
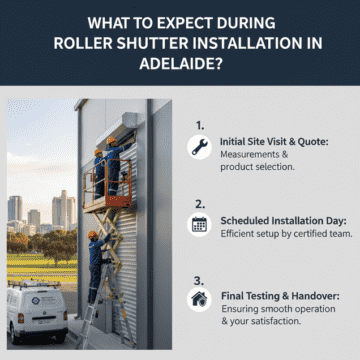
6. What to Expect When You Hire a Specialist – 83692266
Bringing in a licensed shutter technician adds a little to the bill but buys you speed, compliance paperwork and peace of mind.
Typical service workflow and timeline
- Phone or online quote with sizes and fault description
- On-site inspection → fixed-price written quote
- Motor sourced (often already on the van) — 0-3 days
- Swap-out, testing, clean-up — about 90 minutes
- Certificate of Compliance and invoice emailed the same day
Questions to ask before booking
- Are you a licensed electrician and fully insured?
- Which motor brands and warranties do you supply?
- Is CoC, travel and old-motor disposal included?
- Extra cost if further faults appear?
- Current lead time in peak season?
Highlight: Classic Roller Shutters Adelaide’s factory-direct replacement service
Local installers carry genuine parts, offer same-day metro repairs and issue on-the-spot CoCs, making motor replacement a single-visit job for most Adelaide homes.
7. Maintenance Tips to Extend the Life of Your New Motor
A quality tubular motor should last a decade or more, but only if it’s treated kindly. Pop these micro-tasks on your calendar and you’ll delay the next replacement bill.
Monthly operating cycle tests
Run the shutter fully up and down once a month, listening for scraping or lagging. Stop immediately if travel sounds change; early action prevents overload on the windings.
Cleaning and lubrication routines
Vacuum grit from the side guides, then wipe the curtain with mild soapy water. A shot of silicone spray on plastic guide inserts every six months keeps friction low.
Surge protection and battery backup
Fit a plug-in surge board or dedicated RCBO to shield the motor from lightning spikes. In blackout-prone suburbs, a 12 V battery kit lets you raise the curtain without mains power, but requires replacement and more Maintenace.
Scheduling professional inspections
Book a technician every 12–18 months to check fasteners, limit settings and weather seals. A stamped service record helps with warranty claims and home-insurance proofs.
8. Frequently Asked Questions
Quick answers to the questions technicians hear daily about electric roller shutter motors.
How long should a roller shutter motor last?
Expect 10–15 years or 15,000–20,000 cycles; coastal salt and heavy use shorten lifespan.
Why is my electric roller shutter not working?
Check power first—tripped breaker, flat remote batteries, faulty switch. One misbehaving shutter points to a motor or controller fault.
What type of motor is used for roller shutters?
Most shutters use a 240 V AC tubular motor inside the axle; larger doors or off-grid setups run 12/24 V DC units.
Where can I buy a replacement motor and parts?
Buy from specialist shutter suppliers, local factory showrooms or respected online stores—ensure AU electrical approval and written warranty.
Keep Your Shutters Rolling Smoothly
Clock the early warning signs, budget for both the hardware and the sparky, choose a motor with the right torque, follow safe wiring practices, and give the guides a quick clean every few months—do that and you’ll squeeze a decade or more from your new drive unit. If you’re in Adelaide and would rather skip the ladder work, the team at Classic Roller Shutters Adelaide can swing by for a free on-site quote or supply genuine spare parts for confident DIYers. Either way, keep those curtains gliding and your home secure.