You want curtains that look like they belong in a design magazine. Those smooth waves that flow from ceiling to floor. You’ve seen them in hotels and display homes across Adelaide. But when you start searching, you discover these aren’t your regular curtains hanging on a standard rod. They need something called an S fold track.
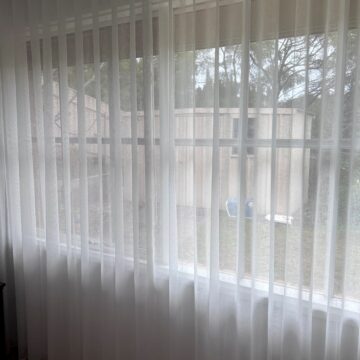
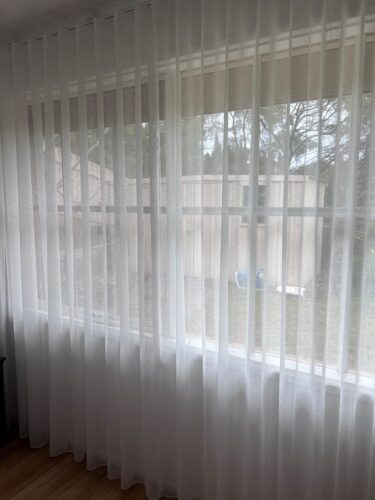
S fold curtain tracks create those signature waves automatically. The track holds your curtains in a specific way that forms consistent S shapes along the entire width. No adjusting needed. You get that polished look every time you open or close them.
This guide walks you through everything you need to know. You’ll learn what makes S fold tracks different, how to measure your windows properly, which track suits your Adelaide home, and how to install it yourself. We’ve kept it practical. By the end, you’ll know exactly what to buy and how to get it up on your wall.
What is an S fold curtain track
An S fold curtain track is a specialised hanging system that creates uniform waves in your curtains without any manual adjustment. The track uses small carriers that clip onto your curtain heading tape at specific intervals. These carriers lock into fixed positions along the track, forming consistent S shaped curves from one end to the other.
How the wave system works
The track positions each carrier at a precise distance from the next one. When you attach your curtain to these carriers, the fabric naturally falls into gentle S curves between each attachment point. You don’t fold or arrange anything yourself. The spacing does all the work.
Most tracks use a corded system that pulls the carriers along the track smoothly. Some Adelaide homes use hand drawn tracks instead, where you simply push the curtains open or closed. Both systems maintain the wave pattern whether your curtains are open, closed, or anywhere in between.
The secret to that designer look is consistent spacing between each carrier, typically 100mm apart.
Key differences from regular tracks
Standard curtain tracks let your curtains hang however they want. Sfold curtain tracks force the fabric into a specific shape. You need curtains made with heading tape designed for this system. Regular curtains won’t work properly because they lack the attachment points for the carriers.
The track itself sits flush against your ceiling or wall. You won’t see decorative rods or rings. Everything stays hidden behind the curtain fabric, which gives you that clean, modern appearance Adelaide homeowners want in contemporary spaces.
Step 1. Plan your window and measurements
You need accurate measurements before you buy anything. S fold curtain tracks come in fixed lengths, and cutting them down affects how the carriers sit. Get this wrong and your curtains won’t hang properly. You’ll waste money replacing the track or end up with waves that look uneven.
Measure your window width correctly
Start by measuring the actual window frame from outside edge to outside edge. Write this number down. Now decide if you want your curtains to sit inside the window recess or across the entire wall. Most Adelaide homes look better with tracks that extend beyond the window frame.
Add 15cm to 30cm on each side of your window frame for the best look. This extension lets your curtains stack back fully when open, giving you maximum natural light. Use these measurements:
- Small windows (under 120cm wide): Add 15cm each side
- Medium windows (120cm to 180cm wide): Add 20cm each side
- Large windows (over 180cm wide): Add 25cm to 30cm each side
Calculate your track length
Your track length equals your window width plus both extensions. A 150cm window with 20cm extensions on each side needs a 190cm track. Round up to the next available track size if your measurement falls between standard lengths.
S fold curtain tracks typically come in 30cm increments from 120cm up to 360cm or more. Check what your supplier stocks before finalizing measurements. You might need to join two tracks together for very wide windows, which requires special connectors.
Account for stack back space
Stack back is the space your curtains occupy when fully open. Sfold curtain tracks need more room than standard tracks because the waves take up width even when bunched. Calculate roughly 20% to 25% of your total track length for stack back on each side.
Your curtains need breathing room. Insufficient stack back space means they’ll always block part of your window, even when open.
For a 240cm track, you need about 50cm to 60cm of wall space on each side beyond your window frame. Measure your available wall space now. If you don’t have enough room, consider mounting the track higher and letting the curtains stack back above the window instead.
Step 2. Choose the right S fold track for your Adelaide home – 83692266 call us
You face several decisions when selecting your track. The wrong choice means dealing with noise, difficult operation, or a track that clashes with your room. Adelaide suppliers stock different brands and styles, each with specific features. Your room’s existing fittings and your budget will narrow down the options quickly.
Consider track material and colour
Most sfold curtain tracks come in either aluminium or plastic construction. Aluminium tracks cost more but last longer and handle heavier curtains without sagging. Plastic tracks suit lighter fabrics and smaller windows where you want to keep costs down.
Colour matters more than you think. White tracks blend into white ceilings and disappear completely. Black tracks work in modern spaces with dark features or exposed beams. Some Adelaide homes need custom colours to match existing trim, though these cost extra and take longer to arrive.
Powder coated aluminium resists Adelaide’s harsh summer heat better than painted plastic. The coating won’t peel or fade when your track sits near west facing windows that get afternoon sun. Budget around $80 to $150 per meter for quality aluminium tracks with good finishes.
Decide on operating system
Corded tracks use a continuous loop that hangs down one side. You pull the cord to open or close your curtains smoothly. This system works well for tracks up to 4 metres wide and costs less than motorized options.
Hand drawn tracks have no cords at all. You simply grab the curtain fabric and push it along the track. These suit smaller windows under 2 metres wide where you can easily reach across. They’re the cheapest option but require more effort to operate daily.
Motorized systems add convenience but expect to pay three to four times more than manual tracks.
Electric tracks connect to wall switches or remote controls. You press a button and your curtains glide open automatically. Adelaide homeowners with high ceilings or multiple large windows prefer this option. Installation requires an electrician to run power cables, which adds to your total cost.
Check mounting options
Your track can fix to the ceiling or the wall above your window. Ceiling mounting creates that seamless look where curtains appear to flow from the ceiling down. Wall mounting works better when you have cornices or need to avoid electrical wiring in your ceiling.
Adjustable brackets give you flexibility during installation. Look for tracks that include both ceiling and wall brackets in the box. Some Adelaide suppliers charge extra for mounting hardware, so check what comes standard with your track before buying.
Bracket spacing matters for longer tracks. You need a bracket roughly every 80cm to 100cm to prevent sagging in the middle. Heavy curtains require closer spacing, sometimes every 60cm, which means buying additional brackets separately.
Step 3. Install the S fold curtain track
You have your track and measurements ready. Now you need to get it mounted properly. A wonky installation means your curtains won’t glide smoothly and those waves will look uneven. Take your time with this step. Rushing through the bracket placement causes problems that force you to drill extra holes in your walls or ceiling later.
Gather your tools and materials, or call us on 83692266
You need specific tools before you start drilling. S fold curtain tracks require more precision than standard curtain rods. Missing one tool means stopping mid installation and heading to Bunnings, which wastes your entire morning.
Collect these items:
- Power drill with drill bits (masonry bit for plaster, wood bit for timber)
- Spirit level (minimum 60cm long)
- Pencil for marking
- Tape measure
- Screwdriver (often Phillips head)
- Ladder or step stool
- Rawl plugs or wall anchors (if mounting into plasterboard)
- Safety glasses
Check your track package for the included screws and brackets. Some Adelaide suppliers provide all mounting hardware, others expect you to buy screws separately based on your wall type.
Mark your bracket positions
Start by finding where your first bracket goes. Measure from the corner of your wall to your planned track position. Use your spirit level to draw a light pencil line across the full width where the track will sit. This line keeps everything straight.
Mark each bracket position along your line. Place the first bracket 10cm from each end of your track. Space remaining brackets evenly between these end points, typically every 80cm to 100cm. For a 240cm track, you need brackets at 10cm, 120cm, and 230cm from one end.
Your track will sag in the middle if you skip brackets or space them too far apart.
Hold each bracket against your line and mark through the screw holes with your pencil. Double check these marks sit level before drilling anything. One bracket out of alignment throws off your entire track.
Secure the brackets to your surface
Drill pilot holes at each pencil mark. Use a 3mm drill bit for most applications. Go slowly and keep your drill straight, not angled. Plasterboard walls need rawl plugs inserted into each hole before you screw in the brackets. Solid timber or brick surfaces can take screws directly.
Insert the first bracket at one end and secure it with screws. Don’t fully tighten yet. Add the bracket at the opposite end next, then fill in the middle brackets. This method lets you make small adjustments before everything locks into place.
Check your level across all brackets one final time. They should sit perfectly aligned. Tighten each screw firmly but don’t overtighten or you’ll crack the bracket. Plastic brackets especially need a gentle touch.
Clip the track into the brackets
Your brackets have small clips or channels that hold the track. Slide one end of your track into the bracket at either end first. Push it up and back until it clicks or locks into position. Work your way along the track, clipping it into each remaining bracket.
Some tracks use set screws that lock the track to the bracket. Tighten these screws with your screwdriver once the track sits properly in all brackets. Test that the track doesn’t slide sideways when you push it.
Pull the cord or slide the carriers along the track to check everything moves smoothly. Any catching or sticking means a bracket isn’t aligned properly. Loosen that bracket, adjust it slightly, and retighten before adding your curtains.
Step 4. Hang and adjust your curtains
Your track sits securely on the wall or ceiling. Now you attach the curtains and fine tune how they hang. S fold curtain tracks need curtains with heading tape that matches the carrier spacing. Regular curtains won’t work because they lack the right attachment points. Your curtain supplier should confirm the heading tape matches your track before you buy.
Attach the carriers to your curtain heading
Lay your curtains flat on a clean floor or large table. Find the heading tape along the top edge. This tape has small pockets or loops sewn at regular intervals, typically every 100mm. Each pocket corresponds to one carrier on your track.
Start at one end of your curtain. Clip the first carrier into the first pocket on your heading tape. Work your way across, attaching each carrier to the next pocket in sequence. The carriers snap or hook into place with a firm push. Missing a pocket throws off the entire wave pattern, so count carefully as you go.
Test the glide and wave formation
Slide your curtain along the track once all carriers attach. The fabric should move smoothly without catching or bunching. Each wave should look identical to the next one. Uneven waves mean you’ve skipped a pocket or attached carriers incorrectly.
Your curtains should form perfect S shapes without any manual adjustment needed.
Pull the cord or push the curtain to fully open position. Check that the stack back sits neatly to one side. Close the curtains again and verify they meet in the middle without gaps.
Make final spacing adjustments
Stand back and look at your curtains from across the room. The waves should flow consistently from top to bottom. Adjust the track position slightly if the curtains drag on the floor or hang too short. Most Adelaide homes look best with curtains that just kiss the floor or hover 10mm above it.
Check that your curtains open and close easily without resistance. Tighten any loose carrier clips that rattle or slide out of position during operation.
Next steps
You now know how to choose and install sfold curtain tracks in your Adelaide home. You’ve measured your windows correctly, selected the right track material and colour for your space, mounted the brackets securely on your walls or ceiling, and hung your curtains with proper wave formation. Your curtains should glide smoothly and create those designer waves you wanted from the start.
The installation takes patience and precision, but the result transforms your entire room. Those uniform folds give you a polished, contemporary look that standard curtain rods simply can’t match.
If drilling into your ceiling or dealing with electrical upgrades for motorised tracks feels beyond your comfort level, professional installation removes all the guesswork. Classic Roller Shutters Adelaide supplies and installs Sfold curtain tracks along with a complete range of window coverings throughout Adelaide. Their experienced team measures your windows, recommends the right track system for your needs, and handles the entire installation process from start to finish. You get expert advice from a local Adelaide business that understands South Australian homes and delivers quality results without the hassle.