You’ve picked the perfect curtains, but they look skimpy when you hang them. The problem isn’t the fabric or colour. How wide should curtains be matters more than most people realise. Curtains that are too narrow create gaps at the sides, make windows look smaller, and give your room a cheap, unfinished appearance. Too wide, and they bunch awkwardly or won’t fit on your rod at all.
The solution is surprisingly straightforward. Professional curtain installers use a simple multiplication formula based on your rod width. This formula accounts for the natural draping and fullness that makes curtains look expensive and tailored. You don’t need special tools or advanced measuring skills. You just need the right ratio for your specific curtain type.
This guide walks you through each step of measuring curtain width correctly. You’ll learn the standard multiplication formula, how different heading styles change your calculations, and what to factor in for proper stacking and overlap. By the end, you’ll know exactly what width to order for that luxury look professional designers achieve every time.
Why accurate curtain width creates a luxury look
The difference between budget curtains and designer curtains often comes down to one measurement. Professional designers know that proper width creates the soft folds and fullness that signal quality. When you walk into a luxury hotel or high-end home, the curtains have generous fabric that drapes naturally. This fullness isn’t an accident. It’s the result of calculating how wide should curtains be using proven ratios that account for the fabric’s natural movement.
The fullness factor
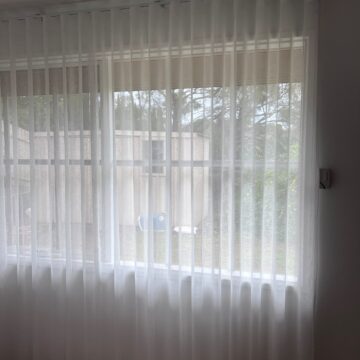
Curtain fullness refers to the ratio between fabric width and rod width. A standard ratio is 2:1, meaning your curtain panels need to be twice as wide as your rod. For lightweight sheers or luxury heavyweight fabrics, designers increase this to 2.5:1 or even 3:1. This extra fabric creates the graceful ripples and folds you see in magazine photos. Without adequate fullness, your curtains hang flat against the window like a shower curtain, exposing the mechanics of your rod and brackets.
Proper curtain fullness transforms a window from functional to focal point.
How narrow curtains cheapen your space
Skimpy curtains create visual gaps that draw attention to all the wrong places. You see the edges of the window frame, portions of the wall, and sometimes even the blinds underneath. The fabric pulls taut when you close them, creating strain marks around the rings or hooks. Your windows appear smaller because the curtains can’t extend beyond the frame. Instead of framing the window generously, narrow panels make the whole installation look like an afterthought. The room loses the polished, finished appearance that proper curtain width delivers automatically.
Step 1. Measure the curtain rod or track
Before you can calculate how wide should curtains be, you need an accurate starting measurement of your curtain rod or track. This measurement becomes the foundation for all your subsequent calculations. Grab a metal tape measure (cloth ones stretch and give false readings) and clear any decorative finials or end caps from your rod temporarily if possible.
Measure from bracket to bracket
Position your tape measure at the point where your curtain rings or hooks will start on one side. This is typically where the bracket stops the rings from sliding off, not where the decorative finial begins. Pull the tape straight across to the identical stopping point on the opposite side. Record this measurement in centimetres for precision. If you’re measuring a ceiling-mounted track, run your tape along the full length of the track itself, from the point where the first glider sits to where the last glider stops.
Your rod width measurement, not your window width, determines curtain sizing.
Account for extension capability
Check whether your rod extends beyond its current position. Many telescoping rods adjust to accommodate different widths. If you plan to mount the rod wider than its current setting to create a more generous window treatment, measure your intended final width instead. This allows you to order curtains that will work with your planned installation, not your temporary setup.
Step 2. Apply the multiplication formula
Once you have your rod measurement, you apply a simple multiplication formula to determine how wide should curtains be. This formula accounts for the natural folds and pleating that create a professional appearance. The standard approach multiplies your rod width by a fullness ratio that matches your fabric type and desired look.
Standard fullness ratios
Different curtain styles require different multiplication factors. Lightweight sheers need more fabric to avoid looking sparse, whilst heavy blockout curtains can work with less fullness. Use these proven ratios to calculate your ideal width:
| Curtain Type | Fullness Ratio | Rod Width × Ratio |
|---|---|---|
| Heavy blockout | 1.5 to 2 times | 200cm rod = 300-400cm fabric |
| Standard cotton/polyester | 2 to 2.5 times | 200cm rod = 400-500cm fabric |
| Lightweight sheers | 2.5 to 3 times | 200cm rod = 500-600cm fabric |
Match your multiplication factor to your fabric weight for natural, professional draping.
Calculate your curtain width
Take your rod measurement and multiply by your chosen ratio. For example, a 250cm rod with standard curtains needs 250cm × 2 = 500cm of total fabric width. This total gets divided between your panels. If you’re hanging two panels, each needs to be 250cm wide (500cm ÷ 2). Round up to the nearest available size if your calculation falls between standard widths.
Step 3. Adjust for different heading styles
Your curtain heading style directly affects how wide should curtains be because different headers consume varying amounts of fabric. A pencil pleat heading gathers fabric tightly at the top, requiring more width than an eyelet heading that spaces rings evenly. This means your multiplication formula from Step 2 needs adjustment based on which heading style you’ve chosen. Ignoring this factor leads to curtains that either bunch excessively or hang too flat.
Common heading types and their fabric needs
Each heading style creates a unique gathering pattern at the top of your curtain. Here’s how to adjust your calculated width:
| Heading Style | Adjustment Factor | Example (200cm rod) |
|---|---|---|
| Eyelet/grommet | Use standard ratio | 400cm fabric |
| Tab top | Use standard ratio | 400cm fabric |
| Pencil pleat | Add 25% more width | 500cm fabric |
| Pinch pleat | Add 15% more width | 460cm fabric |
| Rod pocket | Use standard ratio | 400cm fabric |
Pencil pleat headings need the most fabric because they create tight, continuous gathers.
Calculate your adjusted width
Take your fabric width from Step 2 and multiply by the adjustment factor. If you calculated 400cm for standard curtains but chose pencil pleat heading, multiply 400cm × 1.25 = 500cm total fabric width. This ensures your heading style creates the intended visual effect without pulling the fabric too taut or creating excessive bunching at the top.
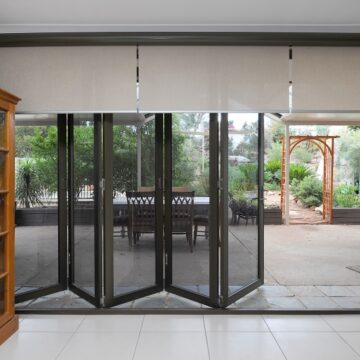
Step 4. Factor in the stacking and overlap
Your curtain width calculations need to account for two practical factors that affect how curtains function daily. Stacking space refers to the room your curtains occupy when fully opened against the wall. Overlap describes the center section where two panels meet when closed. Both measurements directly impact whether your curtains clear the window properly and close without gaps. These factors become especially critical if you’ve already calculated how wide should curtains be based on fullness alone.
Calculate stacking space
When you pull curtains open, the gathered fabric stacks against the wall on either side of your window. Heavy fabrics with generous fullness require more stacking room than lightweight materials. A good rule allocates 15 to 20 centimetres of wall space on each side beyond your window frame. If your rod extends 30cm past the frame, your curtains will stack comfortably within that space. Insufficient stacking room forces your curtains to block portions of the window even when fully opened, reducing natural light and making the window appear smaller.
Adequate stacking space keeps your view clear when curtains are open.
Plan for center overlap
Two curtain panels need 10 to 15 centimetres of overlap where they meet in the centre. This overlap prevents light gaps and maintains privacy when your curtains are closed. Add this measurement to your total fabric calculation by including an extra 5 to 7.5cm per panel. Your curtain track or rod should have centre brackets or stops that position the panels to create this natural overlap without forcing them together.
Getting the perfect fit
You now have the complete formula for determining how wide should curtains be for any window in your home. Start with your rod measurement, apply the appropriate multiplication ratio for your fabric type, adjust for your chosen heading style, and factor in stacking space plus centre overlap. These four steps eliminate guesswork and deliver the professional draping and fullness that transforms ordinary windows into polished design features.
Accurate measurements prevent costly ordering mistakes like panels that hang too flat or bunch awkwardly on your rod. Take your time with each calculation step, particularly when measuring your rod and choosing your fullness ratio based on fabric weight. Round up to the nearest available size if your calculations fall between standard widths. This ensures you have adequate fabric rather than too little, which is impossible to fix after installation.
If you prefer expert guidance for your window coverings, Classic Roller Shutters in Adelaide offers free in-home consultations. Their experienced team measures, manufactures, and installs curtains, blinds, and shutters with precision, ensuring the perfect fit and function your windows deserve.