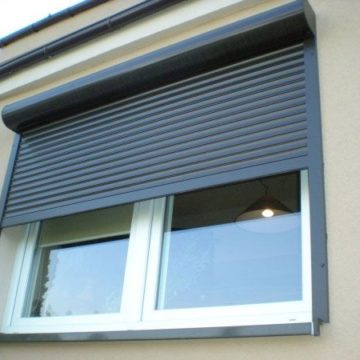
Your roller shutter strap has finally given up, the winder spins freely and the curtain refuses to move, or its jammed. Before you book an expensive replacement shutter, know this: swapping a manual control on a standard window typically costs just $145–$180 in parts and labour 83692266
This practical guide goes well beyond a quick price check. You’ll learn how to confirm the fault, measure the right tape length, source reliable parts in Adelaide or online, and fit them safely without damaging the headbox or paintwork. Step-by-step photos, tool lists and troubleshooting tips are included, along with a frank look at when it makes sense to ditch the strap altogether and upgrade to an electric motor. Whether you’re a DIY first-timer or simply weighing up the call-out fee, every section is written to save you time, money and frustration.
Step 1: Confirm the Shutter Really Needs Replacement
A snapped tape isn’t the only thing that can stop a roller shutter in its tracks. Misdiagnosing the problem leads to wasted dollars on parts you never needed—or worse, replacing a whole curtain when a $25 strap would have done the trick. Before you jump to a full manual roller shutter replacement, spend a few minutes running through the checks below. Most can be done from inside the room with a torch and a pair of gloves. Call Classic for an honest opinion and quote on 83692266
Identify the most common manual shutter failures
- Frayed or completely severed strap/tape
- Jammed or tangled cord inside the wall cavity
- Cracked winder box, usually visible as hairline splits near the handle
- Slipped or broken axle (torsion) spring making the curtain feel impossibly heavy
- Bent or dented slats that bind in the side tracks
- Curtain derailed from the drum wheel after high winds
Tell-tale symptoms include the shutter refusing to budge, lifting only half-way before dropping, uneven movement from side to side, or scraping/grinding noises coming from the headbox.
Inspect and diagnose without risking injury
- Isolate the window—close any interior blinds and clear furniture so you can work freely.
- Put on cut-resistant gloves and safety glasses; aluminium edges inside the headbox are razor sharp.
- Lower the shutter completely with gentle tension on the strap. If it won’t move, don’t force it.
- Remove or hinge open the pelmet lid. Use a torch to spot:
- Loose or missing fixing screws
- Broken strap loops wound around the drum wheel
- Rusty or gummed-up torsion springs
- Slats sitting higher on one side (a sign of a derailed curtain)
- Perform quick functional tests: lightly pull the strap—does it run smoothly? Rotate the winder spindle by hand—any grinding? Sight down both guide rails for obvious dents.
Document what you see with a phone photo; it’s handy for comparing against replacement parts later or emailing a technician.
Decide between minor repair, partial replacement or full curtain swap
Use age, wear level and colour availability as your guide. A shutter older than 12 years or finished in an out-of-production colour can be hard to match, pushing you toward a larger upgrade.
| Fix option | DIY parts cost | Technician cost* | When it makes sense |
|---|---|---|---|
| Replace strap or winder | <$90 | $145–$180 | Tape/winder visibly damaged; curtain otherwise straight |
| Curtain swap (reuse headbox & guides) | $250–$450 | $500–$750 | Multiple bent slats, faded colour, drum + guides OK |
| Entire shutter incl. guides | $700–$1,000+ | $1,000–$1,400+ | Severe corrosion, non-standard sizes, poor insulation |
*Typical Adelaide metro rates, 2025.
If your findings point to a simple part failure, proceed to measuring. If corrosion or structural damage is obvious, skip ahead to Step 7 and consider an electric upgrade instead.
Step 2: Measure Up and Calculate Your Budget
Before you click “add to cart” on a new strap or winder, you need two figures nailed down: the exact size of the parts and the real-world cost once delivery or a tradie’s invoice is factored in. A five-minute measuring session with a tape, notepad and smartphone camera prevents the classic DIY headache of winding 4 metres of tape into a drum that really wanted 5 metres. Accurate numbers also let you decide whether a manual roller shutter replacement is worth a lazy Saturday or if paying a technician is the smarter move.
Measuring strap length, axle diameter and opening size
Getting the right dimensions is straightforward—just work methodically:
- Headbox width – pop the pelmet lid and measure the inside face from left to right in millimetres (mm).
- Reveal height – with the shutter fully down, measure from the underside of the headbox to the sill. That’s the amount of tape that has to travel.
- Tape track distance – measure from the wall penetration to the winder box position; add 150 mm to allow for routing around the pulley.
- Axle diameter – use a vernier or ruler across the drum wheel. Most residential shutters use a 60 mm octagonal axle; note this in case you need a replacement spring.
Use the reveal height to choose a strap length:
| Standard strap length | Suits window height* | Typical product code |
|---|---|---|
| 3 m | ≤ 900 mm | Tape-3 POLY |
| 5 m | 900 mm–2100 mm | Tape-5 POLY |
| 8 m | 2100 mm–3200 mm | Tape-8 POLY |
*Add 500 mm if the winder box sits lower than the sill (common beside sliding doors).
If your measurements fall between sizes, round up; excess tape can be trimmed, but coming up short means re-ordering.
Typical DIY parts prices in Australia (2025)
Budget for the parts below; stocked at classic:
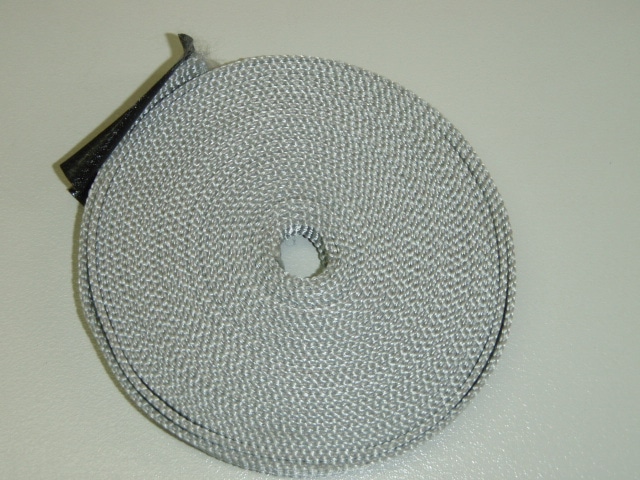
- Strap/tape (5 m reinforced polyester): $15–$25
- Cord (Ø5 mm nylon): $15–$20
- Internal winder box with spring: $50–$80 – we stock all the brands (types)
- Stainless pulley guide: $8–$14 we stock all the brands
- Full manual control kit (strap, winder, pulleys, anchors): $55–$75
Delivery runs $10–$25 unless you click-and-collect locally. We can also post
Estimated total outlay: DIY vs hiring a technician
Let’s crunch the numbers for a common 1200 mm × 1800 mm lounge window:
| Item | DIY cost | Technician cost* |
|---|---|---|
| 5 m strap | $22 | —$145 |
| New winder box | $28 | —$180 |
| Misc. fixings & sealant | $10 | — |
| Delivery | $15 | — |
| Labour (your time, 1 hr) | $0 | — |
*Average Adelaide metro rates, GST inc.
Step 3: Source Quality Parts and Tools 83692266 we have everything here
The best-written instructions won’t help if the parts you fit stretch, rust or strip their gears six months later. Spend a few extra dollars on OEM-grade components and you’ll only do the job once. Below is a shopping list tailored to the most common manual roller shutter replacement scenario—snapped strap and tired winder—plus the tools and safety kit that keep knuckles intact.
Essential replacement parts checklist
- Reinforced polyester strap or nylon cord (match the length you calculated in Step 2)
- Internal winder box with pre-loaded spring and cover plate
- Drum wheel or strap anchor clip for the axle (only if the old one is cracked)
- Inner and outer pulley wheels to guide the tape through the wall
- Axle torsion spring (mandatory if the curtain feels heavy or stops halfway)
- Slat pins or end locks for any loose slats you spotted during inspection
- Stainless steel screws and nylon wall plugs (4 mm–6 mm diameter)
- Exterior silicone sealant to weather-proof the wall penetration
Tip: buy a full “manual control kit” if two or more of the above items look worn; it’s often cheaper than piecemeal ordering.
Recommended tools and safety gear
- Phillips and flat-blade screwdrivers (magnetic tips save frustration)
- 10 mm socket or nut-driver for headbox screws
- Masonry drill with 6 mm bit for fresh wall fixings
- Long-nose pliers or strap-puller clamp to keep tension on the tape
- Adjustable ladder rated to your weight and ground conditions
- Personal protective equipment: cut-resistant gloves, safety glasses, dust mask
Keep a torch, permanent marker and your phone camera handy for reference photos and marking hole positions.
Step 4: Remove the Existing Manual Mechanism
Before any screws come out, remember that you’re dealing with a counter-weighted curtain that can shoot up if tension is lost. A tidy, methodical removal makes the rest of your manual roller shutter replacement a breeze and avoids nicked paint, stripped screws, or worse—springs whipping back at you. Allow 15–25 minutes for the whole strip-down on an average ground-floor window.
Lower and secure the curtain before beginning work
- Wind the shutter right down until the bottom bar seats firmly on the sill.
- Use two strips of low-tack masking tape (or a short timber prop) to hold the bottom bar in place—essential on breezy days when slats like to rattle.
- If any electrical wiring for future motorisation runs through the headbox, isolate the circuit at the switchboard; no one needs a 240 V surprise while wrangling aluminium.
- Place an old towel on the interior floor to catch debris and protect the wall when the winder box comes off.
Opening the pelmet or headbox safely
Exterior headbox (most brick-veneer Aussie homes):
- Set your ladder square to the window and undo the two or three front fascia screws with a Phillips driver.
- Support the cover with your free hand and tilt it forward; sharp edges can slice gloves, so guide it to the ground instead of letting it hang.
In-wall (recessed) box:
- Pry off the plastic trim with a flat screwdriver, starting at a corner.
- Slide the metal lid forward 20 mm, then drop it slightly to clear the clips.
With the lid off, take a quick photo of the strap path around the drum and pulleys—this is your cheat sheet when routing the new tape.
Detaching the worn strap or cord
- Locate the strap anchor clip on the drum wheel. Pry it open with long-nose pliers and pull the frayed tape free.
- Rotate the drum by hand, unwinding the remaining strap in a controlled manner. If the torsion spring fights you, clamp the drum gently with vice-grips to stop back-spooling.
- Feed the loose strap through the wall guide towards the room. Most winders are held by two screws; back these out and slide the box off the wall, allowing the old tape to trail out.
- Bag and bin the strap—modern polyester contains fibreglass filaments that itch like insulation batts if they end up in the laundry.
Assessing winder box and wall penetrations
With the wall now bare, inspect:
- Winder spindle: any ovaling or hairline cracks? A sloppy spindle warrants a full box swap.
- Wall plugs: if screws pulled out with no effort, the masonry or studs need new 6 mm nylon anchors.
- Plaster edges: crumbly gypsum around the penetration should be scraped back and filled before re-mounting the new box; otherwise, the winder plate will never sit flush.
- Pulley guide: spin it—if it squeaks or binds, replace it now; a $10 part beats premature strap wear.
Tick these items off and the demolition phase is done. Your shutter is safely immobilised, the cavity is clear, and you’re ready to install fresh gear in the next step.
Step 5: Install the New Components
With the old gear removed and the shutter safely at rest, you’re past the messy part. The next half-hour is simply reversing the process in a cleaner, more controlled way. Keep every fastener within arm’s reach and resist the urge to skip pre-tensioning the drum—that’s the difference between a feather-light lift and an arm-workout every morning.
Fitting a new strap or tape into the drum wheel
- Trim the factory-sealed end of the new tape square so it slides easily into the drum slot.
- Feed 40–50 mm of tape through the slot and fold it back on itself to create a locking barb; secure with the tiny self-tapper supplied in most kits.
- Wind the drum clockwise (left-hand shutters) or anti-clockwise (right-hand shutters) four to six full turns. A vice-grip clamped to the axle stops it unspooling while you reach for the next tool.
- Keep the tape flat—no twists—before guiding it over the top pulley and through the wall guide. A simple half-turn twist now can abrade the strap in months, not years.
Tip: If the drum feels gritty, mist the axle bush with silicone spray before winding; never use grease, it traps dust.
Replacing the winder box and pulley
- Hold the new winder against the wall at 900–1100 mm above the finished floor—comfortable for both kids and adults. Mark the two fixing holes with a pencil.
- Drill 6 mm pilot holes (masonry bit for brick, wood bit for timber stud) and push in nylon wall plugs flush with the surface.
- Thread the tape through the external wall guide, around the internal pulley, and into the winder slot. Pull 150 mm of slack, then wind the handle to take up tension until the spring clutch “clicks”.
- Seat the box against the wall and drive two 10 gauge screws through the plate into the anchors. Tighten firmly but don’t bury the plate into soft plaster—it must sit flat to avoid binding.
- Snap on the plastic faceplate; this hides the screws and keeps inquisitive fingers away from the recoil spring.
Check the pulley one last time: it should spin freely, be square to the wall, and sit clear of paint drips or render that might snag the tape.
Re-tensioning the axle spring for smooth operation
A lazy spring is the number-one cause of “too heavy” complaints after a manual roller shutter replacement. Two people make the next steps safer, but you can solo it on smaller windows:
- Person A stands outside (or on a safe ladder) holding the bottom bar.
- Person B rotates the drum by hand, adding quarter-turns of pre-tension. After each quarter-turn, Person A checks whether the curtain will stay halfway without slipping.
- The sweet spot is reached when the shutter:
- Rests mid-travel unaided,
- Requires only light force to lift, and
- Doesn’t rocket upwards when fully released.
Most residential drums land between 6 and 8 quarter-turns. Exceed manufacturer torque limits printed on the spring tag; more is not better—an over-wound spring can shear, sending the curtain crashing down.
Reassembling the pelmet/headbox and final fittings
- Replace any insulation felt that tore during removal; it stops metal-on-metal chatter.
- Offer the lid up to the headbox, tilting it slightly so the rear lip engages first, then swing the fascia closed and re-insert the screws you bagged earlier.
- Run a bead of exterior-grade silicone around the wall penetration outside to seal out wind-driven rain and spiders—clear or colour-matched to brick for a neat finish.
- Remove the masking tape or timber prop from the bottom bar and give the winder three slow, full lifts and lowers. Listen for:
- Scraping (slat out of track),
- Clicking (strap catching on pulley), or
- Thumping (spring over-tensioned).
Tighten any screws that work loose during this test cycle. Wipe fingerprints off the aluminium with a damp microfiber cloth, and dispose of off-cuts responsibly.
Congratulations—you’ve just completed the trickiest stage of a manual roller shutter replacement. The shutter should now glide up with two fingers and stop exactly where you want it. A quick coffee break and you’ll be ready for Step 6: testing and fine-tuning.
Step 6: Test, Adjust and Troubleshoot
The new strap is in, the winder feels solid and the pelmet is back on—time to see whether the shutter actually behaves. A structured test run catches 95 % of faults while you’ve still got tools in hand, rather than discovering them on a cold, rainy morning when the bedroom is stuck in darkness. Work methodically: one complete up-and-down cycle to gauge basic function, a second to fine-tune tension, and a final pass for lubrication and safety checks.
First lift test – checking smooth operation
- Hold the winder handle lightly and lift the shutter in one slow, continuous motion.
- Observe the strap: it should stay centred on the pulley with no fraying, twisting or audible scraping.
- Pause at mid-height—does the curtain remain stationary without support? If it drifts, add or remove a quarter-turn on the axle spring.
- Continue winding to the top. The bottom bar should tuck neatly under the headbox without hitting the fascia.
- Lower the shutter and listen for grinding or rattling. A clean, steady “zip” sound is normal; clunks mean a slat is catching in the guide.
Take a quick phone video during the first lift. Slow-motion replay often reveals a misaligned strap or pulley wobble you won’t spot in real time.
Common post-replacement issues and quick fixes
- Strap tracks off-centre or rubs the wall
- Remove pelmet, re-route over pulley ensuring the smooth face of the tape sits against the wheel.
- Shutter heavy to lift even after spring tensioning
- Confirm tape isn’t snagging in the wall cavity; add silicone spray. If weight persists, fit a higher-torque torsion spring.
- Tape twists inside winder box
- Open the box, straighten the strap and check for burrs on the spindle that may be catching the weave.
- Bottom bar won’t close flush
- Inspect side tracks for screws protruding or debris; realign any bent slats.
- Curtain rises too fast and slams
- Back off spring by a quarter-turn at a time until travel is controlled yet still self-supporting at half height.
Most niggles resolve within ten minutes; anything structural—cracked drum, deformed guides—points back to Step 4 for parts replacement.
Lubrication and final safety check
- Spray a light, silicone-based lubricant along both side tracks; avoid petroleum sprays that attract dust.
- Wipe slats with a damp cloth and pH-neutral detergent, then dry to prevent water spots.
- Re-torque all visible screws, especially headbox fascia and winder plate fixings—hand-tight plus a quarter-turn is sufficient.
- Store leftover strap and the old parts label somewhere handy; it simplifies future orders or warranty claims.
With these checks ticked off, your manual roller shutter replacement is not only complete but tuned for years of trouble-free use.
Step 7: Considering an Upgrade to Electric Operation
Swapping a strap is cheap and satisfying, but if the idea of winding-by-hand every morning already feels dated, an electric retrofit could be the smarter long-term move. Modern 240 V tubular motors slip inside the same axle, add remote or smartphone control and, once set, rarely need attention beyond the odd battery change in the handset. Before you bin the crank, weigh up the upsides, downsides and dollars.
Pros and cons of converting manual to electric
Advantages
- Push-button or app control—ideal for hard-to-reach windows and people with limited mobility
- Programmable timers optimise insulation; shut at noon on a 40 °C Adelaide day without you being home
- No visible strap or winder, so interior walls stay clean and designer-friendly
- Motors come with 5–7-year warranties; goodbye annual tape frays
Disadvantages
- Up-front cost is higher than a straight manual roller shutter replacement
- 240 V connection must be wired by a licensed electrician under SA legislation
- Headbox may need slight enlargement in very old shutters (<1990)
- Wall patching where the old winder sat, plus paint touch-ups
When to call an accredited installer 83692266
- Second-storey or commercial shutters where ladder work is unsafe
- Heritage facades that require discrete cabling and council approvals
- NDIS or aged-care modifications where compliance documentation is mandatory
- Situations needing integrated home-automation (e.g., Google Home, Alexa)
- Any time you smell burnt wiring, hear grinding from an ageing motor, or simply don’t fancy mixing electricity and aluminium in the same afternoon
Classic Roller Shutters Adelaide has in-house electricians and retrofit kits matched to most OzRoll and CW headboxes, so a site visit can confirm motor compatibility, quote the electrical work and patch the old winder hole in a single appointment. If your strap has snapped twice in as many years, an upgrade might finally let you retire that screwdriver for good.
Step 8: Preventive Maintenance to Maximise Longevity
A fresh strap and winder will last five-plus years, but only if the shutter is kept clean, lubricated and free of minor faults that can snowball into another manual roller shutter replacement. The good news: most upkeep takes less than ten minutes and costs next to nothing.
Routine cleaning and lubrication schedule
Dust, salt spray and bushfire ash build up in the guides and drum, grinding away at the tape. Stick to this simple rhythm:
- Quarterly – soft-brush the slats and vacuum the side tracks with the crevice tool.
- Half-yearly – wipe slats with warm, pH-neutral detergent; rinse and dry.
- Every six months – apply a light silicone spray to both tracks and the drum bushings. Avoid oil-based products that gum up.
- Annually – drop the pelmet lid and check that the strap is still centred on the drum and free of fluffing or glazing.
Set a calendar reminder or align the tasks with your smoke-alarm battery change – future you will thank you.
Seasonal inspection checklist
Extreme SA summers and winter storms place different stresses on aluminium shutters. Use the printable table below to stay ahead:
| Season | Quick check | Why it matters |
|---|---|---|
| Summer (Dec–Feb) | Confirm slats close flush; look for melted end locks | Gaps let ember attack during bushfire danger days |
| Autumn (Mar–May) | Tighten guide-rail screws | Expanding/contracting masonry can loosen fixings |
| Winter (Jun–Aug) | Inspect seals and silicone; note any rust marks | Prevents water ingress and corrosion |
| Spring (Sep–Nov) | Test torsion spring balance | Early warning of fatigue before holiday break-ins rise |
Print, laminate, and tape this to the inside of your pelmet for instant reference.
Quick DIY fixes that prevent major replacements
- Replace a single bent slat as soon as it’s spotted; $8 now beats a $300 curtain later.
- Re-seat loose slat pins/end locks before they chew the side tracks.
- Brush out leaf litter from headboxes after storms to stop moisture pooling.
- If the strap feels rough, clip frayed fibres flush and dab with clear nail varnish – a two-minute hack that delays full tape replacement.
- Give the winder screws a quarter-turn when you change the wall calendar; a snug fit prevents spindle wobble and premature wear.
A dash of routine maintenance keeps your shutters rolling effortlessly, protects your earlier DIY investment, and pushes the next manual roller shutter replacement well into the future.
Keep Your Shutters Rolling Smoothly
Everything you’ve read boils down to five golden rules: diagnose the fault first, measure twice, choose quality parts, follow the safety steps, and test until the shutter glides without a hiccup. Tick those boxes and a $75 Saturday project can squeeze another five years out of a window that looked destined for the tip.
Stay ahead with light maintenance—vacuum the tracks, tighten the odd screw and hit the strap guides with silicone when you wash the car. Your reward is a cooler house in summer, snug rooms in winter and one less thing to fix before guests arrive.
Prefer to save the weekend for footy, or need an odd-colour tape that matches the rest of the façade? Reach out to the team at Classic Roller Shutters Adelaide for spare parts, expert troubleshooting or a no-obligation technician visit.