Cranking a shutter strap every morning feels quaint until your shoulder reminds you it’s 2025. Electric roller shutters remove the heavy lifting—one press on the remote and the curtain glides to its stop, locking automatically and sealing out heat, noise and prying eyes. The good news is you don’t have to buy an entirely new shutter; most manual systems can be upgraded in an afternoon by slipping a tubular motor inside the existing axle. If you need this fixed call us on 83692266 or email kirsty@classicrollershutters.com.au and we will book you in for our electrician to complete the job for you from beginning to end.
This guide shows you exactly how. We start with a quick checklist to confirm your shutter is a suitable candidate, then walk through choosing the right motor, gathering parts, removing the old winder and wiring the new drive in line with Australian standards. You’ll learn typical costs, safety tips and the small adjustments that make a big difference to smooth, quiet operation. Read on and turn that daily chore into a push-button convenience that pays off for years.
Step 1: Confirm Your Roller Shutter Can Be Converted
Before you buy a motor, make sure the shutter you own will actually accept one. The happy news is that more than 90 % of Australian domestic units with 40–60 mm octagonal axles can be retro-fitted, but there are a few deal-breakers. A quick inspection now saves frustration (and electrician call-out fees) later.
Inspect the Existing Curtain, Axle and Guides
- Look for bent slats, swollen foam or rusty end locks—motorising a damaged curtain only accelerates failure.
- Spin the axle by hand; it should turn smoothly and stay level in the side frames.
- Confirm the axle is octagonal and hollow: you’ll need a clear bore for the tubular motor to slide in.
Check Box Clearance and Axle Diameter
- Measure the headbox depth: 150 mm clears most 45 mm motors, 180 mm for 60 mm units.
- If the box is jam-packed with curtain roll, a smaller-torque slim motor or a new pelmet may be required.
Evaluate Power Access and Compliance Requirements
- Identify the closest GPO or lighting circuit; a licensed electrician must handle any 240 V work under AS/NZS 3000.
- Plan a concealed cable path and ensure an RCD protects the new spur. Battery or solar kits avoid wiring but still need safe mounting.
Estimate Budget: Parts, Labour, Electrical
Typical single-storey retrofit (per window):
- Motor $260–$350
- Controls $50–$80
- Electrician $150–$250
- Installer labour $100–$200
Expect $550–$900 in total, with extra allowance for high access or smart-home add-ons. Armed with these figures you can decide whether to DIY, hire a pro, or keep cranking.
Step 2: Select the Motor Type and Control System
Picking the right drive gear is where most conversions succeed or fail. Power source, control style and raw torque must all line up with the shutter’s size and your lifestyle. Below we compare the three common motor categories and show how to crunch the numbers before you change a manual roller shutter to electric motor.
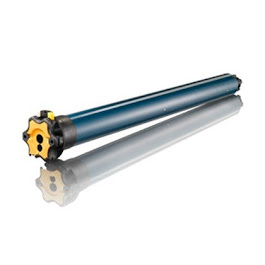
Tubular 240 V Hard-wired Motors
These are the workhorses seen in most Adelaide retrofits.
- Pros: high torque (20–120 Nm), unlimited daily cycles and whisper-quiet gear trains.
- Cons: requires a licensed sparkie to wire a 3-core flex into a protected circuit and space for an isolator.
Ideal for large patio doors, commercial shopfronts or homes where mains power is already nearby.
Low-voltage Battery and Solar Kits
A plug-in charger or slim solar panel tops up an internal lithium pack.
- One full charge lasts 9–12 months on an average bedroom window.
- Perfect for second-storey openings where running conduit would cost more than the motor itself.
Battery replacement is DIY and takes five minutes with a Philips driver.
Sizing the Motor – Torque and Axle Compatibility
Use the rule of thumb:
Torque (Nm) = (curtain weight kg × axle radius m) ÷ 0.8
Quick picks:
- < 900 mm wide window: 10 Nm motor
- 900–1800 mm: 20 Nm
- 1800–2400 mm or heavy extruded slats: 40 Nm+
Always match the motor’s drive wheel to a 40 mm or 60 mm octagonal axle to avoid slippage.
Step 3: Source All Parts, Tools and Safety Gear
Before any screws come out, make sure every part of the conversion kit—and the gear to fit it—is on hand. Nothing stalls a weekend project quicker than a missing drive ring or a flat‐bladed screwdriver. If you don’t have the parts and need this fixed, call us 83692266
Conversion Kits vs Individual Components
| Option | What’s inside | When to choose |
|---|---|---|
| All-in-one kit | Motor, crown & drive, bracket, remote/receiver, fixings | First-time DIY, guaranteed compatibility |
| Pick-and-mix | Motor model, separate adapters, switch or hub, stainless screws | Odd-sized axles, mixing brands, bulk discounts |
Tools Required for DIY Installation
- Cordless drill + 3 mm, 5 mm bits
- Nut-setter or socket for side plates
- Insulated screwdrivers
- Multimeter & non-contact voltage tester
- Fish tape, cable clips, step ladder
PPE and Safety Precautions
- Safety glasses and cut-resistant gloves for sharp slats
- Hearing protection if drilling brick
- RCD tester and lock-out tag for existing circuit
- Stable platform—never balance on the window sill
Step 4: Remove the Manual Winder Mechanism
Manual roller shutters rely on either a nylon strap, steel tape or crank gearbox to lift the curtain. All three must be taken out before the new tubular motor can slide into the axle. Work slowly; once the winder is released the curtain wants to drop, so controlling the load is key to avoiding bent slats—or worse, bruised fingers.
Safely Lower and Secure the Curtain
- Wind the shutter fully down.
- While a helper holds the bottom bar, cut the strap/tape near the winch with side cutters.
- Clamp the bottom bar to the sill with spring clamps or wedge a block in each guide to stop accidental movement.
Detach the Winch Box or Strap Winder
- Remove the faceplate screws, then back out the two coach screws fixing the winder to the wall stud.
- Pull the assembly clear; patch or cap the hole if you won’t reuse it for cabling.
Extract the Tape/Axle Gear and Prep for Motor Bracket
- Pop the pelmet cover, loosen the axle retaining screw and slide the axle 30 mm toward the winder side.
- Lift out the plastic gear wheel or tape drum; discard.
- Deburr the axle bore and wipe out dust so the motor drive wheel seats flush.
Step 5: Fit the Electric Motor and Hardware
Now the old winder is gone, the fun bit begins—sliding the new drive train into place. Take your time; correct alignment here prevents noisy operation later and is the make-or-break stage when you change a manual roller shutter to electric motor.
Install the Motor Bracket inside the Side Frame
Hold the supplied steel bracket flush against the winder side frame, 20 mm below the axle centre line. Pre-drill 3 mm pilot holes, then secure with two 10 g × 16 mm stainless self-tappers. The notch should face the headbox so the motor head can clip in without twisting cables.
Insert the Tubular Motor into the Axle
Slide the crown and drive wheel onto the motor, matching the axle’s 40 mm or 60 mm profile. Feed the motor into the hollow axle until you feel the drive wheel “bite”. Rotate gently until the arrow on the motor head points straight down; this keeps wiring stress-free.
Re-fit End Caps, Clips and Test Manual Rotation
Replace the nylon end caps and spring clips, then use the hand-set tool to turn the motor a half-cycle. The curtain should roll smoothly and stay level. If it binds, pull the motor 10 mm out, realign, and retest before moving on to wiring.
Step 6: Connect Power and Controls
The motor is in, so the last technical hurdle is getting safe power to it and telling it when to run. Australian law is crystal-clear: any fixed 240 V work must be carried out or signed off by a licensed electrician. Even if you’re using a low-voltage battery pack, secure cabling and correct polarity protect both the motor and your warranty. This step links the mechanical install to modern convenience—and it’s where a tidy finish really shows.
Running Cable Through the Wall Cavity
- Drop a 3-core flex straight down the stud bay closest to the motor head; avoid horizontal runs where nails lurk.
- Maintain a minimum 25 mm bend radius and sleeve the cable in 20 mm conduit where it exits masonry or the pelmet.
- Staple every 300 mm, leaving slight slack to prevent tension when the shutter box is re-mounted.
Wiring to an Isolated 240 V Spur or Plug-in Transformer
Hard-wired motors:
Brown = Active, Blue = Neutral, Green/Yellow = Earth. Connect through a fused, RCD-protected spur or Clipsal plug base.
Battery/solar kits: simply push the low-voltage barrel plug into the motor socket, then mount the solar panel facing true north at roughly 30 °.
Pairing Remotes or Integrating with Smart Hub – this changes depending on the brand you bought. please see directions we send you with purchase.
- Press the motor’s “P2” button twice—curtain jogs once.
- Press the chosen remote channel’s up button—jogs again to confirm pairing.
- For Wi-Fi or Zigbee bridges, add the device in the app, then expose it to Google Home or Alexa for voice control.
Mandatory Electrical Testing and Certification (AS/NZS 3000)
Your sparkie will record insulation resistance, polarity and RCD trip times, then place a compliance label inside the headbox. Keep the certificate with your manuals; insurers may ask for it if issues arise after you change a manual roller shutter to electric motor.
Step 7: Set Limits, Test Operation and Tidy Up
With the motor humming, the final job is to teach it where to start and stop, confirm safety functions, and button everything back up so rain, dust and curious fingers stay out.
Programming Up/Down Limit Stops
- Press the motor’s
UPbutton; when the curtain nears the pelmet, release it 10 mm early. - Hold the “P2” or limit-set key until the curtain jogs—upper limit saved.
- Repeat for
DOWN, stopping just before the bottom bar hits the sill.
Correct limits prevent slat crush and motor strain.
Functional Testing for Obstacle Detection and Overload
Place a rolled towel in the guide. Run the shutter down: it should stop and retract slightly. If not, increase sensitivity via the motor’s dip switch or app.
Seal, Weather-proof and Replace Pelmet Cover
Grommet the cable exit, add a bead of neutral-cure silicone, then clip the pelmet lid back, tightening all side-plate screws.
User Handover and Maintenance Tips
Demonstrate single-press, group, and manual override functions; hand over the compliance certificate and a six-monthly maintenance checklist. Remind owners to recharge battery packs yearly.
Step 8: Ongoing Care, Troubleshooting and Upgrades
Installing the motor is only half the story; keeping it whisper-quiet and reliable for the next decade is the real win. A simple routine, quick fixes and knowing when to phone a pro will protect both your investment and your sanity.
Routine Maintenance Schedule
- Every 6 months: wipe slats with mild soapy water, spray silicone into the guides, check remote batteries.
- Annually: cycle limits twice, tighten side-plate screws, fully recharge or replace lithium packs on battery models.
- After storms: inspect pelmet for water ingress and clear any grit from the bottom bar.
Common Faults After Conversion and How to Fix Them
Fault: motor hums but curtain stays put → drive wheel slipped; loosen axle screw, re-seat, re-tighten.
Fault: shutter stops mid-travel → re-teach limits or clear debris in guides.
Fault: remote range poor → change coin cell or relocate RF receiver away from foil insulation.
When to Call a Professional or Upgrade Further
Burning smell, repeated RCD trips, or slats snagging despite cleaning are red flags—switch off and book a technician. Ready for smarter living? Add sun/wind sensors or integrate the roller shutter into Zigbee or Wi-Fi scenes for hands-free comfort.
Smooth Sailing Ahead call us on 83692266
Changing a manual roller shutter to an electric motor isn’t witchcraft—just a logical series of checks, swaps, and tweaks. Confirm the shutter is healthy, choose a motor with the right grunt, collect the bits, remove the old winder, slide in the tubular drive, wire or plug it safely, set the limits, and keep up with a dab of silicone spray every six months. Do that and the daily shoulder-straining cranks are replaced by a quiet hum and a perfectly parked curtain, morning and night.
If you’re in Adelaide and would rather spend your weekend somewhere other than up a ladder, let the people who build and repair shutters every day handle it. Book a no-obligation in-home quote or motor upgrade with Classic Roller Shutters Adelaide and enjoy push-button comfort long before your next power bill lands.