Buying roller shutters shouldn’t feel like guesswork, yet quotes can vary from $1000 to $2,600 per window once size and motor options are factored in. Before you commit to anything—whether that’s a DIY kit from Bunnings or a fully installed system—it pays to understand exactly where every dollar goes.
Roller shutters are exterior-mounted barriers made from interlocking slats that roll neatly into a slim hood, giving homes and businesses a tidy answer to security, insulation, light control and storm protection. This guide unpacks the different materials and operating systems, breaks down every cost driver, compares DIY with professional installation, and shows you how to spot a reputable supplier in Australia. By the end you’ll know what to expect on the day of installation, how to budget for maintenance, and how to squeeze the most value out of your investment. Let’s start with the numbers and finish with a shutter that fits your home—and your wallet.
What Exactly Are Roller Shutters?
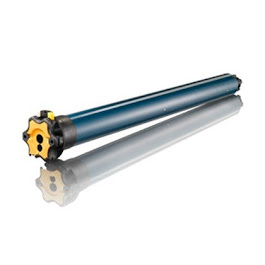
A roller shutter is a custom-made curtain of interlocking metal slats that slides up and down inside side tracks fixed to the outside of a window or door. When opened the slats coil around an axle hidden inside a slim head box (pelmet), leaving the view unobstructed; when closed they form a solid barrier against heat, noise, prying eyes and flying debris.
Core components
- Slats: foam-filled or extruded, linked by hinges
- Pelmet/hood: powder-coated aluminium box that hides the roll
- Side guides: U-shaped channels that keep the curtain aligned
- Axle & bearings: the tube the slats wrap around
- Drive: manual strap/winder or 240 V, battery or solar motor
- Controls: wall switch, remote, phone app or smart speaker
Operation is simple: pull the strap, turn the crank or press a button and the motor winds the curtain on or off the axle. Limit switches stop the travel automatically, preventing jams and stretching.
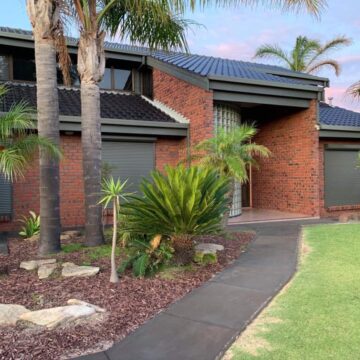
You’ll see shutters on suburban homes, cafés, shopfronts, kiosks and even fire-rated server rooms. In Australia, product selection must consider AS 3959 for bushfire zones and AS/NZS 1170 for wind loads—both of which can influence price and specification.
Key Materials Used
- Aluminium – lightweight, corrosion-resistant; foam-filled for insulation or extruded for strength.
- Steel – heavy-duty security in high-risk areas; costs more and needs galvanising.
- PVC/composite – budget DIY kits, limited colours, lower impact resistance.
Types of Slat Profiles
- Single-wall: basic, cheaper, suits smaller spans.
- Double-wall (insulated): two skins with foam core; better thermal and acoustic ratings.
- Perforated or punched: airflow and visibility for shops.
- Specialty: fire-rated BAL-40, cyclone-rated C4, or extra-wide commercial slats—all with price premiums.
Pros and Cons of Roller Shutters for Australian Homes
Wondering whether a shutter is worth the outlay or just another home-improvement fad? The answer depends on how much you value security, comfort and running-cost savings versus the upfront bill and a few lifestyle compromises. The quick rundown below weighs the big wins against the common gripes so you can decide with eyes wide open.
Main Advantages
- Security boost – interlocking aluminium slats and side rails deter opportunistic break-ins far better than flyscreens.
- Thermal insulation – CSIRO testing shows up to 90 % reduction in summer heat gain and 70 % winter heat loss.
- Noise control – insulated profiles shave roughly 6–10 dB off traffic or bark-happy neighbour sounds.
- Light & glare mastery – block out 100 % of sunlight for shift-workers or home cinemas at the tap of a button.
- Storm and ember defence – cyclone-rated or BAL-40 models protect glass from debris and meet bushfire code, potentially trimming insurance premiums.
Potential Drawbacks
- Hefty upfront cost – $400–$1,600 per window; soften the blow by staging installations room-by-room.
- Loss of outward view – opt for punched or perforated slats to let in filtered light when privacy allows.
- Maintenance needs – guides must be kept clean; book a $150 service every few years to avoid jams.
- Council or strata aesthetics rules – check façade guidelines early or choose colour-matched pelmets for a low-profile look.
- What’s not always in the headline quote:
- Scaffolding or boom-lift hire for upper levels
- Mains connection if the existing circuit can’t handle extra load
- Travel surcharges outside metro areas
- Strata or council permit fees
- Rubbish removal and site cleanup on large projects
Clarifying these items before signing stops “variation” surprises down the track.
How Do Big-Box Store Kits Compare?
DIY kits from retailers such as Bunnings or online vendors advertise prices as low as $650 and up to $1,800 for a single window. On the surface that undercuts many supply-and-install quotes, but remember you’re buying parts only. Add-ons you’ll need to budget for include:
- Measuring mistakes (one misread tape and you’re stuck with a non-returnable custom size)
- Tools: masonry drill, hole saws, rivet gun, silicone, fasteners
- Safety gear and possibly a platform ladder or scaffold
- Electrical compliance certificate if you wire a motor into mains
- Your weekend—or two—on the ladder
For straightforward sheds, holiday shacks or remote areas where trades are scarce, a DIY shutter can be sensible. For most homes, however, the maths flips once you price skilled labour, warranty risk and your own time. A factory-direct supplier who measures, manufactures and installs usually lands within 10–15 % of an honest DIY tally—without the headaches.
Cost by Configuration: Manual, Electric, Battery & Smart-Controlled
Not every roller shutter is wired the same—and price follows the power source. The drive mechanism you choose dictates the motor size (if any), labour requirements and future running costs. Below is a quick look at what you can expect to pay for each configuration, plus the little extras that often hide in the fine print.
Whether you’re renovating a single ground-floor bedroom or fitting out a double-storey façade, use these figures as a sanity check against any quote.
Manual Strap or Winder
- Entry-level spend: $700–$1000 supply only; $900–$1200 installed approx
- No motor or cabling, so labour is mainly drilling guides and feeding a nylon strap or geared crank through the wall.
- Maintenance is cheap—allow $145–$180 for a replacement strap every 5–8 years.
- Best for small, reachable windows where daily winding isn’t a chore.
Hard-Wired Electric (Switch or Remote)
- Typical motor: $500–$1200, rated 20–60 Nm depending on curtain weight.
- Installation adds an electrician at $150–$300 per shutter if an existing circuit can be tapped; a new dedicated circuit can double that.
- Pros: effortless operation, grouping multiple shutters, elderly-friendly. Cons: walls may need chasing to conceal cabling.
Battery or Solar-Powered
- Add-on kit (panel, Li-ion battery, controller): $250–$400.
- Total installed cost usually $900–$1,600 because no mains wiring or electrical certificate is required.
- Ideal for upper-storey retrofits where running 240 V cables would blow the budget; expect $450 min battery replacement every 5–7 years.
- Slightly slower raise/lower speeds than mains motors.
Smart Home Integration
- Start with any electric shutter, then add a Wi-Fi hub or Zigbee bridge for ~$150.
- Voice control via Alexa, Google or Apple Home Kit is normally free once the hub is paired.
- If you’d like remote access or automation rules (e.g., close at 2 pm on 35 °C days), budget $50–$80 for a premium app licence.
- Remember to keep firmware updated—cyber-security is now part of home maintenance.
Other Factors Pushing Your Quote Up or Down
Two neighbours can order the same size roller shutter and still receive very different quotes. That’s because suppliers add or subtract dollars for a handful of secondary factors you won’t find on every price list. Keep an eye on the items below when you compare figures so you’re judging like-for-like.
Window/Opening Size and Shape
- Heights over 2 m need heavier-gauge slats and higher-torque motors—add 15–25 %.
- Extra-wide sliders may require a split curtain and central mullion.
- Arched heads, bay windows or corner returns mean custom-bent guides; budget another 15–25 %.
Bushfire & Cyclone Ratings
- BAL-40 or BAL-FZ compliant shutters use stainless pins, intumescent seals and thicker extrusions.
- Cyclone C4 ratings in northern Australia call for wind-lock side tracks.
- Expect a 30–50 % premium, but note these specs are mandatory in declared zones.
Colour and Finish Options
- Standard Colorbond or Interpon powder-coat is bundled in.
- Non-standard RAL or Dulux colours: +$100–$200 per shutter.
- Timber-look foil or anodising: +$250–$400; lead time may extend by two weeks.
Security Upgrades
- Keyed bottom-rail locks: $40–$60 each.
- Reinforced “security slat” or end-retention system: adds 10–15 %.
- Motion sensor or alarm integration: $120–$250 per opening.
Installation Complexity
- Two-storey work often needs a boom lift or scaffold: $400–$1,000 per day.
- Obstacles—air-con condensers, awnings, security bars—add labour hours.
- Rural or outer-metro travel charges can tack on $2–$3 per kilometre beyond the base radius.
Factor these extras into your budget early and you’ll avoid “variation” shocks once the installers arrive.
Roller Shutter Installation Options and Costs
How the curtain goes from factory floor to your façade is almost as important as the shutter you choose. Australian buyers have three broad pathways—DIY, professional supply-and-install, or slotting the job into a larger renovation. Each carries its own cost structure, time commitment and risk profile.
DIY Installation
Doing it yourself can look cheap on paper:
- Shutter kit: $250–$1,200
- Tools & consumables (drill bits, rivet gun, fasteners, silicone): $120–$250
- Ladder or small scaffold hire: $80–$150 per day
- Electrical compliance certificate (if hard-wired): $160–$300
Add those numbers and the gap to a trade quote narrows fast. Common pitfalls include mis-measured openings leading to water ingress, guides set out of square causing the curtain to jam, and voided warranties if a licensed electrician doesn’t sign off the wiring. Fines for illegal electrical work in SA can top $5,000—hardly a saving.
Professional Installation
Paying a factory-direct installer typically adds $150–$300 per manual shutter or $250–$450 for motorised units, which covers:
- Accurate site measure and templating
- Qualified electrician for 240 V connections
- Sealants matched to your cladding for weatherproofing
- Rubbish removal and a workmanship warranty (usually 5–10 years)
For most households, that bundled expertise offsets the modest labour premium and safeguards the product warranty.
Retrofitting During Renovations or New Builds
If you’re already recladding, rendering or running new electrical circuits, have the builder install sleeves and conduits before walls are closed. This shaves labour time and avoids surface-mounted cabling, often trimming the total shutter bill by 10–15 %. Scheduling the install just after windows are fitted but before final paint also means the pelmet can be recessed for a cleaner look—and one less tradesperson double-handling your façade.
Professional Installation Walk-Through: What Happens on the Day
Professional installers treat the job like a mini building project. Knowing the drill lets you prep the area, avoid delays and keep everyone safe. A tidy workspace, cleared driveway and switched-off power can shave an hour off the visit and spare you a follow-up call.
Pre-Installation Checklist
- Confirm final sizes against quote
- Colour and control choices signed off
- Provide clear access inside and out
- Isolate power if wiring is required
- Remove flyscreens or blinds obstructing guides
- Council/strata approvals ready if needed
On-Site Steps
- Unpack and visually inspect each custom shutter
- Fix side guides square with packers and anchor screws
- Hoist hood, lock axle and bearings in position
- Test-roll curtain; adjust spring tension for smooth travel
- Wire motor and program top/bottom limits (if electric)
- Silicone seal all edges and leave the site spotless
Post-Installation Handover
- Demonstrate manual override, switch and remote
- Provide warranty card, electrical certificate and care guide
- Point out cleaning and lubrication spots on guides
- Collect final payment only once you’re satisfied
Ongoing Costs: Servicing, Repairs and Energy Savings
A roller shutter is hardly a set-and-forget purchase. Factor in a little time and cash for routine care and, on the flip side, bankable energy savings that chip away at the original outlay.
Regular maintenance is mostly DIY: hose dust from the curtain, wipe the guides with mild detergent and run the shutter up and down monthly to keep the axle limber. Allow 15 minutes per shutter each quarter. Every two to three years book a professional service—budget $120–$180—to lubricate bearings, reset motor limits and check weather seals.
Typical repair costs in Adelaide
- Nylon strap replacement: $80–$150 (parts + labour)
- Motor swap (20–60 Nm): $250–$500
- Damaged slat replacement: $10–$25 per slat plus call-out
- Battery pack (solar models): ~$120 every 5–7 years
CSIRO testing shows aluminium shutters can cut window heat gain by up to 40 %. For a brick veneer home using 7,000 kWh annually for heating and cooling at 35 c/kWh, that’s a saving of roughly $980 a year:
ROI Years = Total Installed Cost ÷ Annual Savings
A $4,000 four-window install pays for itself in ≈4.1 years, not counting security or noise-reduction benefits. Keep the guides clean and the maths only improves.
Selecting a Trusted Supplier and Installer
A quality roller shutter is only as good as the company that measures, manufactures and fits it. Prices can look similar on paper, yet workmanship, warranty support and spare-parts availability vary wildly across the industry. Take the time to vet a few local specialists—ideally factory-direct outfits in South Australia—so you know who will still pick up the phone in five years when a motor stops or a storm dents a slat.
Questions to Ask Before You Sign
- Are the shutters manufactured locally or imported flat-packed?
- Does the written quote include GST, electrical connection and any scaffold hire?
- What are the warranty periods on curtain, motor and labour?
- Can you provide licence numbers and public liability insurance certificates?
- How quickly can you source spare parts or attend warranty repairs?
- Will you supply an electrical certificate of compliance for hard-wired units?
Comparing Multiple Quotes
Create a small spreadsheet with columns for size, slat type, operating system, inclusions, exclusions, lead time and total price. Line items that look minor—colour surcharge, disposal fee, extra remotes—add up fast. Apples-to-apples comparison forces each supplier to sharpen their pencil and reveals who’s padding margins with “variations”.
Warning Signs to Avoid
- Demands for deposits above 40 % of the job value
- No physical showroom, workshop or verifiable address
- Sales reps pushing “today only” discounts
- Reluctance to put promises in writing or supply compliance paperwork
- One-man bands with no backup installers or service department
Walk away from any quote that triggers more than one of these red flags; the short-term saving isn’t worth the long-term hassle.
Quick Answers to Common Price & Installation Questions
Quick Answers to Common Price & Installation Questions
How much do roller shutters cost in Australia?
Fully installed models cost $400–$1,600 per window. Size, controls, bushfire rating and access gear move the figure up or down.
Why are Bunnings roller shutters cheaper?
Big-box kits include parts only. You still pay for measuring errors, tools, ladders and electrician, so the saving usually evaporates.
Are roller shutters worth it for insulation?
Yes—CSIRO tests show shutters cut heat gain 40 % and loss 70 %, trimming Adelaide energy bills by hundreds each year.
What are the disadvantages of roller shutters?
Upfront cost, limited outward view and occasional servicing are negatives. Perforated slats, staged installs and regular cleaning soften drawbacks.
Can I install electric roller shutters myself in SA?
Mounting is okay, but SA law demands a licensed electrician for mains wiring—DIY allowed solely on battery or solar versions.
Wrapping Up Your Roller Shutter Decision
A roller shutter isn’t a one-size-fits-all purchase; it’s a mix of window dimensions, operating system, compliance needs and site conditions. Measure accurately (or let a pro do it), decide whether manual, hard-wired or solar control suits your lifestyle, then cost the whole life of the product—installation, servicing and the energy you’ll save. Compare at least two like-for-like quotes, reading the fine print on electrical work, scaffolding and warranty support. If the numbers still feel steep, remember a well-specced shutter can pay itself off in four to six years through lower power bills and fewer smashed-window headaches.
Ready to turn the research into a firm figure? Book a free in-home measure and quote with the local specialists at Classic Roller Shutters Adelaide and tick “secure, insulated windows” off your renovation list.