Remote control roller shutters are motorised window shutters you operate at the touch of a button. Instead of a strap or crank, a small tubular motor lifts and lowers the aluminium curtain while a handheld remote, wall switch or app sends the command. The result is quick, quiet control of light, privacy, heat, noise and security—on a single window or across your whole home—whether you’re installing new shutters or upgrading existing manual ones.
In this guide, we explain how these systems work, what’s included, and the control and power options (mains, battery and solar). You’ll find realistic Adelaide pricing for supply-only, installation and upgrades, plus advice on retrofitting, DIY versus licensed installation in SA, programming remotes, smart home integration, brand compatibility, safety and warranties, maintenance and troubleshooting. We finish with practical tips to choose the right motor and controls for your place.
Key components of a remote control roller shutter system
Whether you’re buying new or upgrading, remote control roller shutters are a simple stack of parts working together: a motor turns the axle; electronics receive your command; the curtain glides in side tracks; and a power source keeps everything moving. Knowing what’s inside helps you compare quotes and pick compatible controls for now and later.
- Aluminium curtain and slats: Insulated slats that roll up into the headbox for security, shade and insulation.
- Headbox and guides: The pelmet that houses the axle, with side tracks to keep the curtain true and quiet.
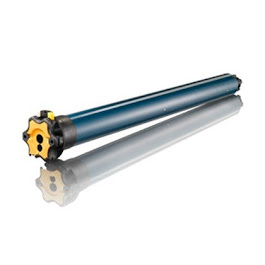
- Tubular motor: Sits inside the axle, with adjustable limit settings for open/close positions.
- Control receiver: Built-in or external radio receiver that talks to your remotes or wall switch.
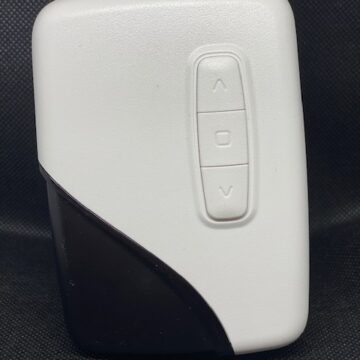
- Handheld remote/wall switch: Single or multi-channel transmitters to run one or many shutters.
- Power source: Mains, battery or solar, with charger or isolator as required.
- Safety and override (optional): Manual crank or disengage pin for emergencies; child-safe controls.
Control options and features for remote control roller shutters
The best control setup is the one that fits how you live. Remote control roller shutters can be run from a simple handheld, a neat wall switch, or upgraded with a Wi‑Fi hub for app control. You can control a single window, group rooms, or the whole house together, and many systems are designed to add more channels or shutters later without rewiring.
- Handheld remotes (single/multi‑channel): Operate one shutter or multiple at once; modern transmitters can run several shutters from anywhere in your home.
- Wall switches: Fixed, tidy control with centralised switching for multiple motorised solutions, ideal for busy family areas and offices.
- External radio receivers: Add wireless control to compatible motors when the receiver isn’t built‑in—handy for upgrades.
- Group and “all” control: Create room or floor groups for quick open/close routines.
- Wi‑Fi hub and app control: Add a hub to manage shutters from your phone and enable whole‑home control without changing motors or remotes.
Power options: mains, battery and solar motors
Power is the backbone of any remote control roller shutters setup, and your choice affects installation, reliability and running costs. All three options deliver the same push‑button convenience; the differences come down to how you feed the motor and how easy the site is to wire.
- Mains‑powered motors: Best for heavy or high‑use shutters. They offer consistent torque and quiet operation, and pair easily with wall switches, remotes and hubs. Requires electrical wiring during install.
- Battery motors: Great for retrofits and upper floors where running cables is difficult. A compact rechargeable pack drives the shutter; you simply top up charge periodically. Minimal disruption and clean finishes.
- Solar motors: A slim panel on the headbox trickle‑charges an internal battery, avoiding mains power entirely. Ideal for sun‑facing elevations and off‑grid efficiency; less suited to shaded verandahs or southern aspects.
Choose based on access to power, window orientation, shutter size and how often you’ll operate them, keeping future smart upgrades in mind.
Benefits for Australian homes and businesses
In our climate, remote control roller shutters deliver practical comfort, security and convenience at the press of a button. From keeping summer heat out to giving after-hours peace of mind, they suit homes, shops and offices alike—and grouping controls means you can open or secure multiple areas in seconds without walking room to room.
- Thermal and glare control: Cut heat gain and glare to help lower heating and cooling costs year‑round.
- Security boost: A tough aluminium curtain deters break‑ins and provides fast whole‑site lockdown.
- Noise reduction: Soften traffic, aircraft and neighbourhood noise for bedrooms, clinics and studios.
- Privacy on demand: Screen windows instantly without committing to heavy curtains all day.
- Automation and accessibility: Timers, group control and app options aid routines and mobility needs.
- Weather protection: Shield glass from wind-driven rain and debris during rough weather.
Prices in Adelaide: supply-only, installed and upgrade costs
Budgets vary by size, motor type and electrical access, but a simple baseline helps. Public guides in Australia cite smaller manual shutters around $300–$350, while larger electric-powered (remote control) shutters are about $900–$1,000 per opening. In Adelaide, your final figure depends on whether you’re buying supply-only, opting for full installation, or upgrading existing shutters to remote control.
- Supply-only (DIY/builders): For new builds or experienced DIY, you’re typically purchasing the motorised shutter, radio receiver and remote(s). Electrical connection and compliance sit with you and your electrician.
- Installed (turn‑key): Includes site measure, local manufacture, fitting, setup and licensed electrical where required. Expect variations by width/height, access (upper storeys), façade material, and chosen controls (single vs multi‑channel, Wi‑Fi hub).
- Upgrades to remote control: Converting manual shutters involves a tubular motor, receiver and remotes (or a battery/solar pack). Costs hinge on the number of openings, power availability, and whether you add group control or smart features.
To compare apples with apples, ask for an itemised quote that lists motor type (mains/battery/solar), number of remotes/channels, any Wi‑Fi hub, electrical allowances, and warranty terms. Classic Roller Shutters offers free in‑home quotes and can price directly from plans for new builds.
Retrofitting existing shutters to remote control
If your shutters still run on a strap or tired wall switch, you can usually convert them to remote control without replacing the curtain or headbox. A technician assesses the slats, guides and axle, then fits a tubular motor inside the drum, adds a radio receiver (if not built‑in), sets limits and pairs your remotes. Choose mains, battery or solar power based on access, window orientation and usage.
- Typical upgrade paths:
- Manual to battery/solar: Clean retrofit with minimal wiring; ideal for upper floors and finished homes.
- Manual to mains‑powered: Highest torque and durability; requires licensed electrical connection.
- Old wired switch to remote: Add an external radio receiver or swap to a remote‑ready motor.
- Pre‑check essentials:
- Headbox space and axle condition to accept a motor.
- Slat weight and width to size the motor correctly.
- Future controls (group remotes or Wi‑Fi hub) to avoid rework later.
Classic Roller Shutters’ repair and electrical teams handle assessments, motor swaps and upgrades across most brands.
Installation: DIY versus licensed professional in South Australia
Installing remote control roller shutters looks straightforward—hang the headbox, slide the guides, fit the motor—but the difference between a smooth, quiet result and a binding, noisy one is in the detail. In South Australia, any work on fixed wiring for mains‑powered motors or hard‑wired wall switches must be done by a licensed electrician. DIY can suit supply‑only battery or solar kits if you’re confident with precise measuring, correct fixings into brick or timber studs, and neat weather sealing around penetrations.
- Use a licensed professional when: you need mains power run to the shutter, an isolator or hard‑wired switch; spans are large or heavy; access is tricky (upper storeys); or you want grouped/centralised controls commissioned and documented for warranty.
- DIY is best kept to: mechanical mounting, hanging the curtain, fitting plug‑in battery/solar components, and basic limit/remote setup on accessible ground‑floor windows.
A professional install typically includes site measure, load checks, bracket placement, compliant cable routing, limit setting, remote pairing, safety testing and an electrical certificate of compliance—minimising callbacks and protecting warranties. If you attempt partial DIY, keep to mechanical tasks and engage a licensed electrician for any mains connection and certification.
Programming and pairing remotes: what to expect
Pairing a new remote to your roller shutters is usually a quick, brand‑guided process. Installers often commission everything on the day, but if you’re adding a handset later, expect to place the motor/receiver into “learn” mode, bind the remote, then fine‑tune limits and groups. Always keep fingers clear of the curtain while setting travel.
- Put the receiver/motor into learn mode (via a small program button or a button sequence).
- Press the program/pair button on the remote to bind.
- Set upper and lower limits so the shutter stops cleanly.
- Assign the shutter to a channel and any group (e.g., “Bedrooms”).
- Test, then save.
- Adding vs reset: You can usually add remotes without wiping existing ones; a full reset clears all pairings.
- Range and reliability: Stand near the headbox, use fresh batteries, and keep antennas unobstructed.
- Safety: Isolate power before removing covers; licensed electricians must handle any mains wiring.
Smart home integration: Wi‑Fi hubs and voice control
Adding a Wi‑Fi hub turns your remote control roller shutters into smart, anywhere‑access shades. The hub bridges your existing radio receivers to your home network so you can use an app to open, close, group, and schedule shutters without changing motors. Installation is usually simple: power the hub, join it to Wi‑Fi, then pair it to each shutter much like adding another remote.
- App control and schedules: Create daily routines, school‑night close times, or holiday modes with one tap.
- Sunrise/sunset automation: Time actions to daylight to manage heat and glare more efficiently.
- Groups and scenes: Run “Bedrooms”, “Street‑front” or “All” together, or include shutters in a goodnight scene.
- Voice control: Many hubs work with popular voice assistants for hands‑free operation.
- Remote access and sharing: Control from anywhere and share access with family or staff.
- Easy retrofit: Hubs layer onto compatible radio motors/receivers, avoiding rewiring; mains‑powered motors still require licensed electrical work in SA.
Classic Roller Shutters can supply and commission hubs to unify shutters, blinds and future upgrades under one simple control.
Brand compatibility and ecosystems to consider
When you choose remote control roller shutters, think in ecosystems: the motor, radio protocol, remotes, wall switches and any Wi‑Fi hub. Popular setups in Australia include Somfy‑based systems with centralised control across multiple Somfy solutions, and Australian platforms such as OZ Roll with their own remotes. Older wired shutters can often be brought into a wireless/app world by adding an external radio receiver, but features may be limited to basic up/stop/down.
- Stay single‑brand where possible: Motors, receivers, remotes and hubs from one ecosystem pair more easily and support group control reliably.
- Mixing brands: Aftermarket radio receivers can add wireless control to compatible motors—verify limits and commissioning steps.
- Plan for smart control: Choose a brand with a hub that supports grouped control and schedules, or confirm a bridge is available for your motors.
- Scale and spares: Check availability of multi‑channel remotes, maximum channels/groups, and replacement parts.
- Protect warranty: Using non‑approved receivers or DIY wiring can affect coverage; licensed electrical work is mandatory for mains connections in SA.
Safety, compliance and warranty essentials
Safety and compliance come first with remote control roller shutters. In South Australia, any fixed wiring for mains‑powered motors or hard‑wired switches must be carried out by a licensed electrician, and you should be issued an electrical Certificate of Compliance. Beyond installation, safe daily use, correct load sizing and sticking with approved components protect both people and your warranty.
- Licensed electrical only: Use a licensed electrician for any mains wiring, isolators and hard‑wired wall switches; keep the Certificate of Compliance.
- Approved components: Stick to brand‑compatible motors, receivers and remotes; non‑approved add‑ons can void warranties.
- Isolation and access: Ensure safe power isolation and clear access to the headbox for servicing.
- Egress and emergencies: Don’t block essential exits; consider a manual override where required.
- Safe operation: Keep hands clear, teach users the stop function, and keep remotes out of children’s reach.
- Weather and obstructions: Avoid running against ice/debris and follow wind guidelines to prevent damage.
- Documentation and care: Get written warranties for motor, controls, curtain and labour; record serial numbers, keep receipts, and follow maintenance schedules.
Maintenance, batteries and troubleshooting tips
A little care keeps remote control roller shutters smooth, quiet and reliable for years. Most upkeep is simple: keep things clean, keep power healthy, and act early if you notice rubbing, slowing or stopping. Always isolate mains power before removing covers, and don’t operate shutters against strong wind or visible obstructions.
- Keep it clean: Wash the curtain and guides with mild soapy water and a soft brush; rinse gently. Avoid high‑pressure cleaning into the headbox or guides.
- Mind the guides: Clear leaves, grit and cobwebs from side tracks; debris is the top cause of sticking and noisy travel.
- Lubrication (if recommended): Avoid oil‑based sprays. If your brand allows, use a dry silicone spray sparingly on moving contact points.
- Remote batteries: Replace handset batteries at the first sign of reduced range or missed presses; re‑pair only if needed after battery change.
- Battery motors: Recharge when movement slows or status lights/beeps indicate low charge. Keep connections dry and secure.
- Solar motors: Wipe panels with a soft cloth to maintain charge; don’t shade panels with awnings or plants.
- Quick fixes:
- No response: Check isolator/breaker, replace remote battery, stand closer, confirm channel, then re‑pair via learn mode.
- Stops short: Remove debris, then re‑set limits per the manual.
- Jerky/noisy travel: Clean guides and check for bent slats; stop using if grinding persists.
- Intermittent control: Keep antennas unobstructed; move Wi‑Fi hubs/receivers away from metal.
- Call a professional when: there’s grinding or burning smell, tripped breakers, damaged slats/axle, failed motor, or repeated limit loss. Licensed electricians must handle any mains wiring faults in SA.
How to choose the right motor and control system for your home
Start with the window, not the gadget. The right setup for remote control roller shutters comes from matching motor torque to shutter size, then choosing a power source that suits your access to electricity and sun. After that, pick controls that fit your routines today and your smart-home plans tomorrow.
- Window size and weight: Bigger, wider or cyclone-prone openings need higher‑torque tubular motors; size correctly to protect the motor and slats.
- Power access and aspect: Choose mains where wiring is practical; pick battery for clean retrofits; use solar on sun‑facing elevations (avoid shaded/southern aspects).
- Usage patterns: High‑use areas (living, shopfronts) benefit from mains for consistent performance; occasional use suits battery/solar.
- Control style and users: Single vs multi‑channel remotes, fixed wall switches for shared spaces, and a Wi‑Fi hub if you want app schedules or voice control.
- Ecosystem and expandability: Stay within one brand for motors, receivers, remotes and hubs to simplify grouping and future additions.
- Build stage: Run cabling during new builds; in finished homes, battery/solar avoids wall chasing.
- Noise and aesthetics: Specify quiet motors and low‑profile headboxes; colour‑match guides and pelmets.
- Compliance and warranty (SA): Use a licensed electrician for any mains wiring and keep the Certificate of Compliance; stick to approved components.
Alternatives if you don’t want roller shutters
If remote control roller shutters aren’t the right fit—for heritage facades, strata restrictions, budget or style—there are plenty of options that still improve comfort, privacy and security. Many can be motorised for the same push‑button convenience, and some pair neatly with existing decor to keep your home’s look consistent inside and out.
- Outdoor blinds (Ziptrak/zip screens): Wind‑resistant mesh or PVC for shade, privacy and weather protection on patios and windows.
- External awnings: Fixed or folding designs to cut heat and glare before it hits the glass.
- Security screens and doors: Add intrusion resistance while letting breezes through.
- Blockout curtains and sheers: Layer for light control, privacy and insulation.
- Cellular (honeycomb) blinds: Excellent thermal performance with a sleek finish.
- Plantation shutters: Durable privacy and light control with a classic look.
- Window films or double glazing: Reduce heat gain and UV without changing the facade.
Frequently asked questions
Here are straight answers to the most common questions we hear about remote control roller shutters in Adelaide. They’ll help you plan an upgrade or a new install with fewer surprises—especially around power options, controls, commissioning and who needs to do what on site in SA.
- Can I convert my manual shutters to remote control? Yes. Most can be retrofitted with a tubular motor and radio receiver without replacing the curtain or headbox.
- Do I need an electrician in South Australia? Yes for any mains wiring or hard‑wired wall switches. Battery/solar kits avoid fixed wiring.
- Will one remote control multiple shutters? Yes. Use multi‑channel remotes to run single windows, groups or “all” together.
- How are remotes programmed? Put the motor/receiver into learn mode, pair the handset, then set upper/lower limits and assign channels/groups.
- What happens in a blackout? Battery/solar systems keep working. Mains‑powered shutters need power restored, unless a manual override is fitted.
- How much do they cost? As a guide, manual shutters ~$300–$350; larger electric/remote shutters ~$900–$1,000 per opening, with install and options affecting the final.
- What about warranty? Terms vary by brand and component. Keep written warranties and your electrical Certificate of Compliance.
Wrap up
Remote control roller shutters make daily life easier—instant comfort, privacy and security with the right motor, power source and controls for your home. You’ve seen the key components, control options, mains vs battery vs solar, realistic Adelaide pricing, retrofit paths, smart upgrades and when to use a licensed electrician in SA.
If you’re in Adelaide, we can help you choose well and install with care. Classic Roller Shutters offers factory‑direct manufacturing, upgrades and repairs, plus free in‑home consultations or quotes from plans. Ready to compare options? Start here: Classic Roller Shutters Adelaide.