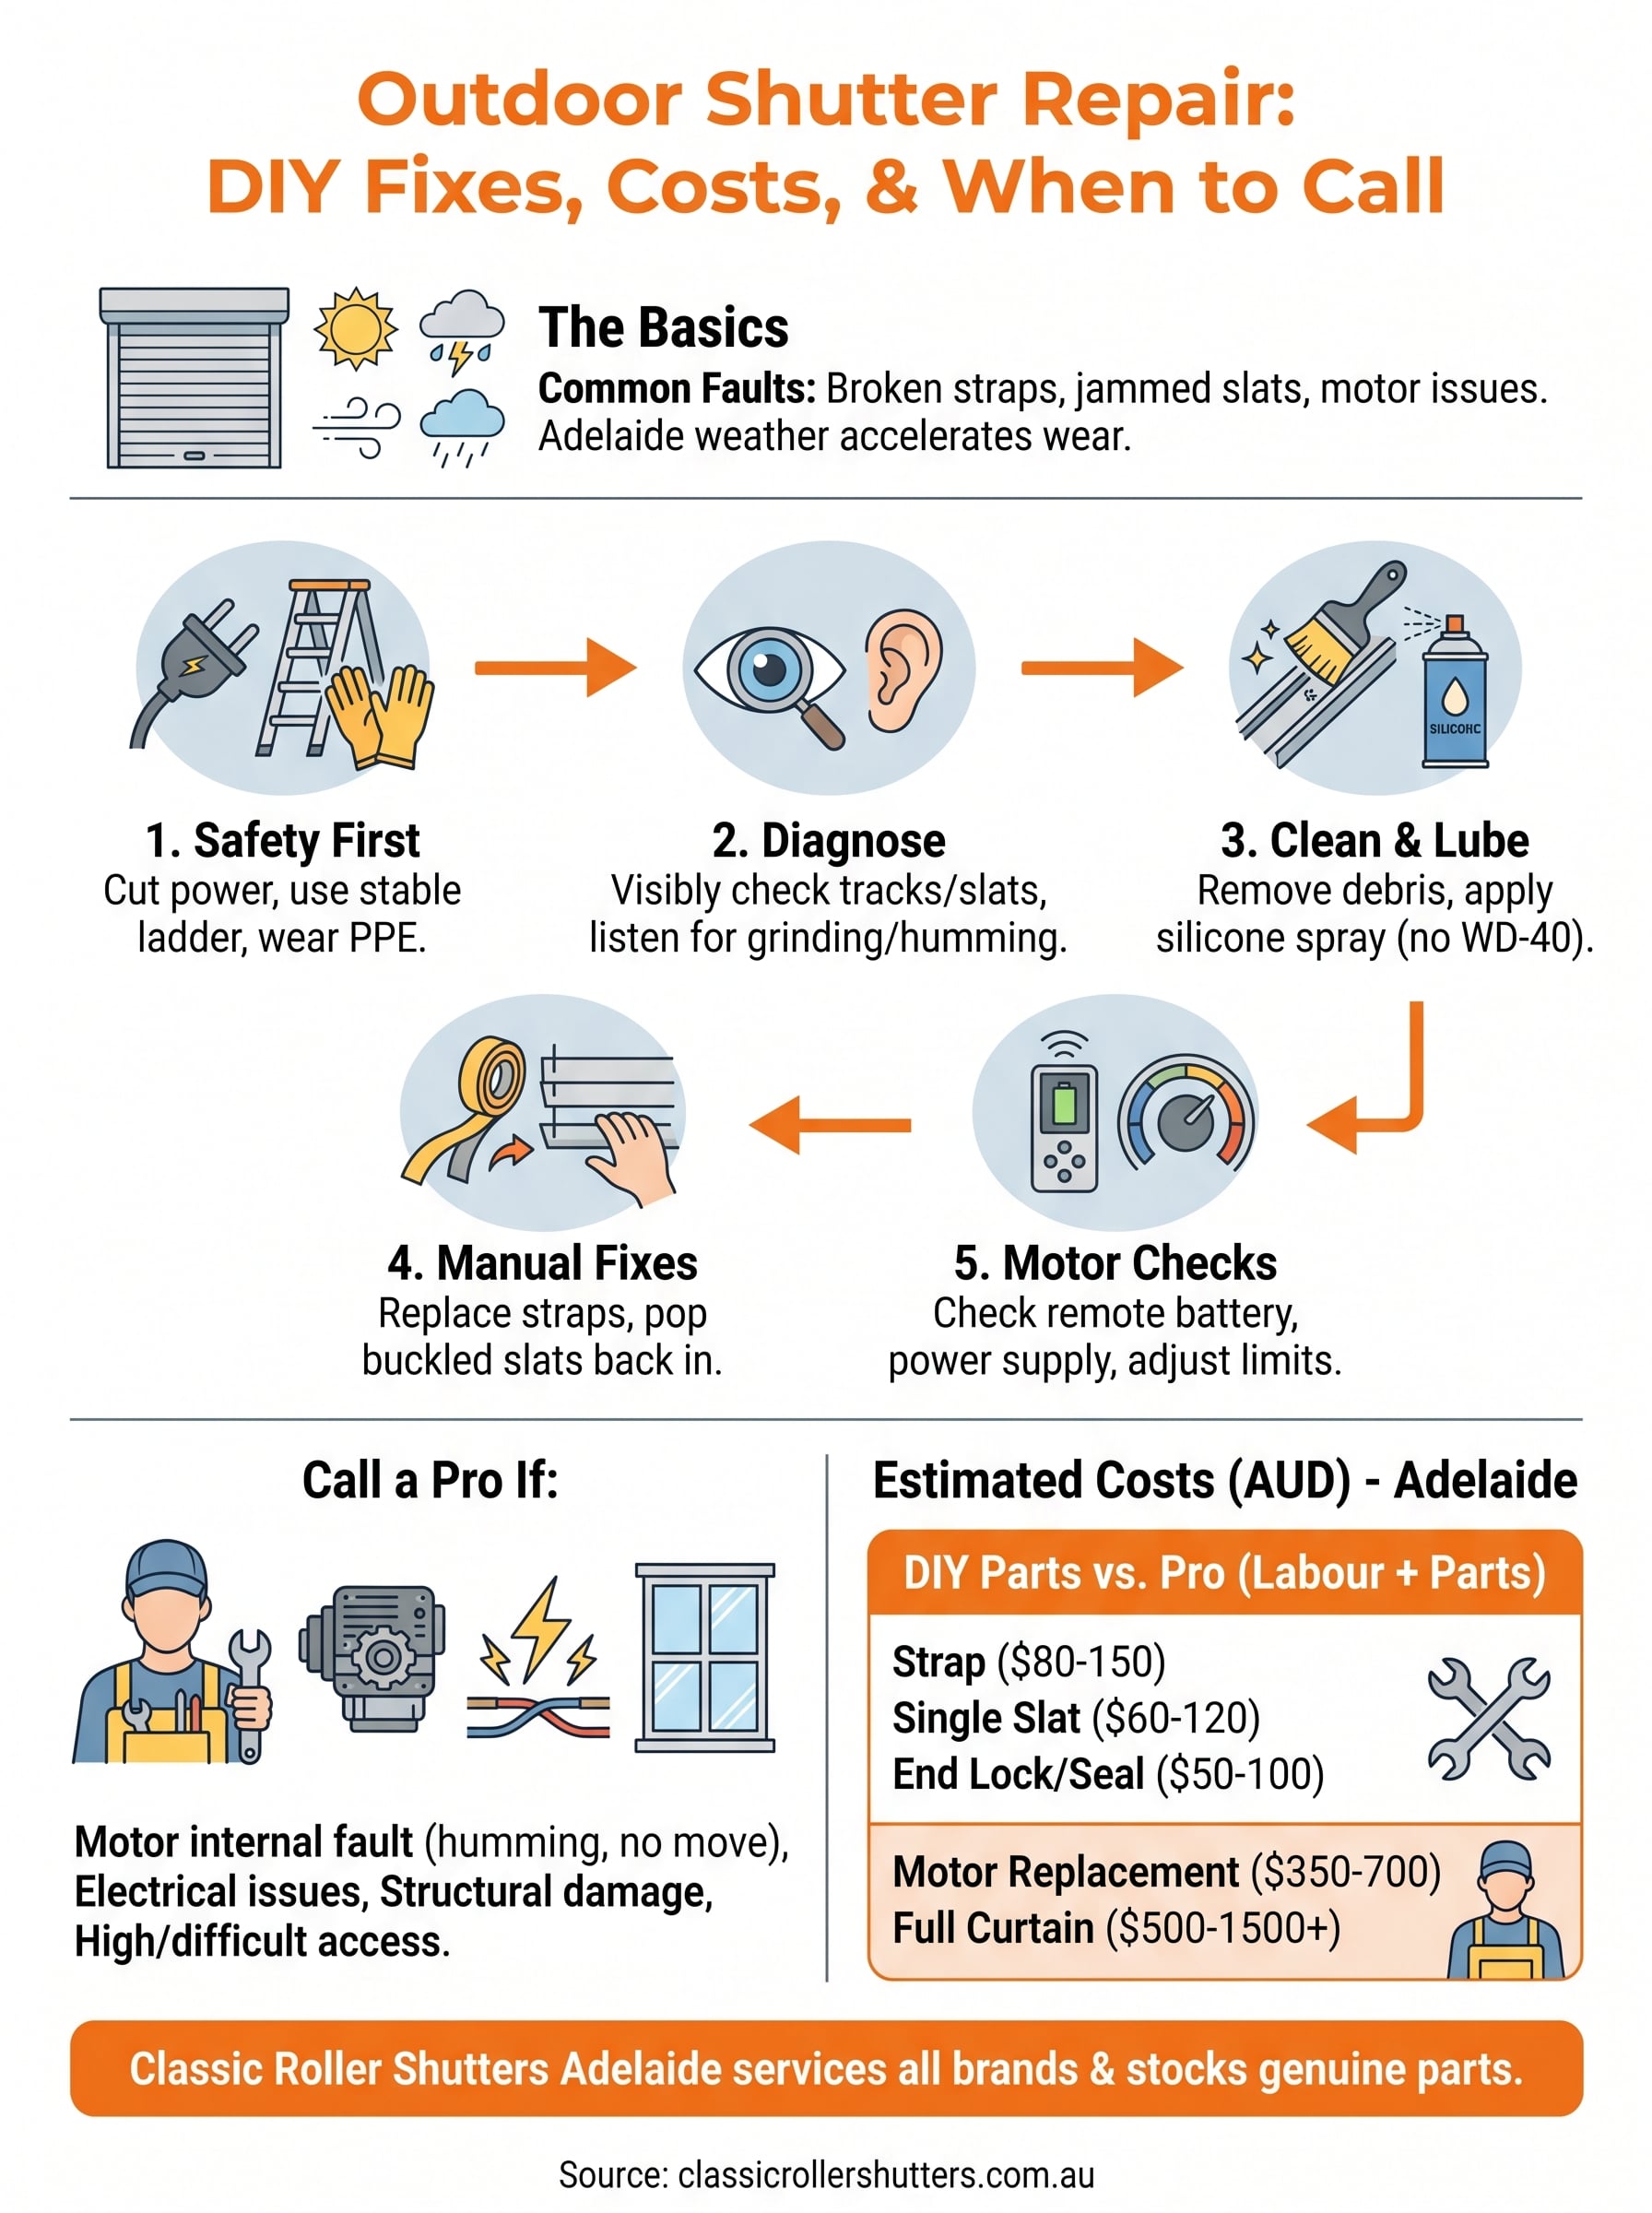
Your outdoor roller shutters cop a beating from Adelaide’s weather, scorching summers, wind, rain, and everything in between. So when a slat jams, a strap snaps, or a motor stops responding, it’s not a matter of if you’ll need outdoor shutter repair, but when. The good news is that some fixes are straightforward enough to handle yourself with basic tools and a bit of guidance.
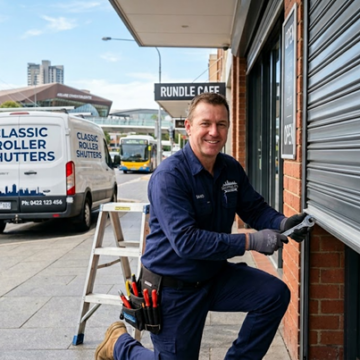
But not every problem is a DIY job. Certain faults, especially electrical or structural ones, need a trained hand to avoid making things worse (or voiding your warranty). Knowing the difference between a quick home fix and a professional repair can save you real money and keep your shutters working for years longer. That’s something we see daily at Classic Roller Shutters Adelaide, where our dedicated repair division services all brands of roller shutters across Adelaide.
This guide walks you through common outdoor shutter problems, what you can realistically fix yourself, what repairs typically cost, and the clear signs it’s time to call in a professional.
What counts as an outdoor shutter and common faults
Outdoor shutters cover a broad range of products, and the type you have directly affects which repair approach applies to your situation. Before you grab a screwdriver or call a technician, it helps to know exactly what you’re working with and what tends to go wrong with each type.
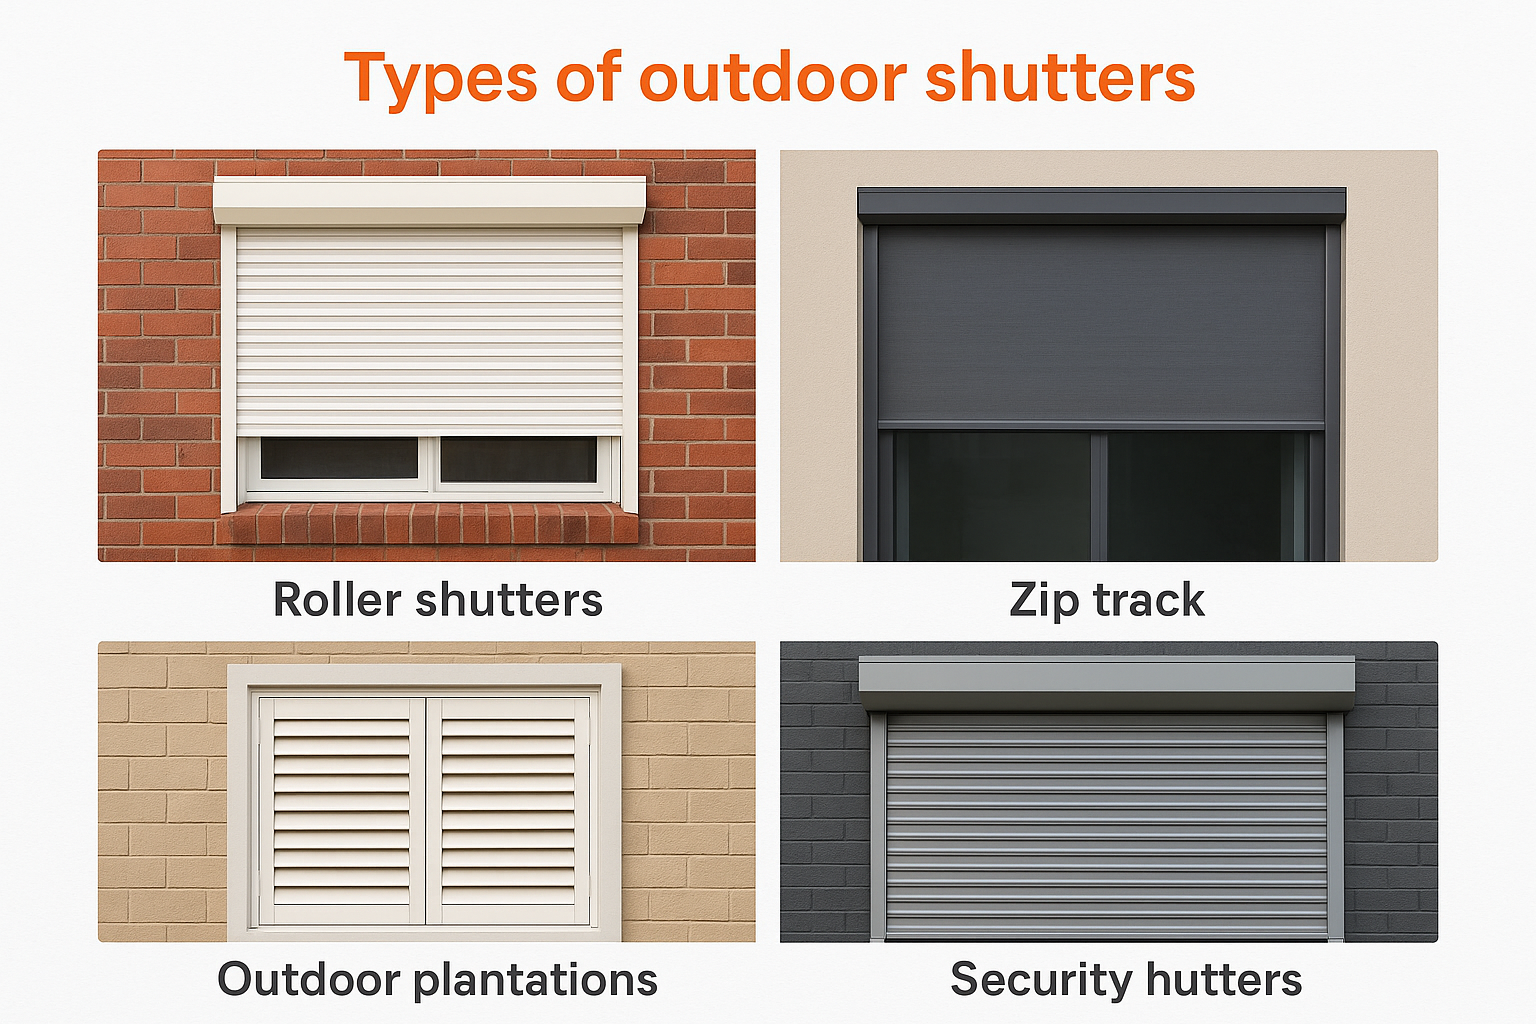
Types of outdoor shutters
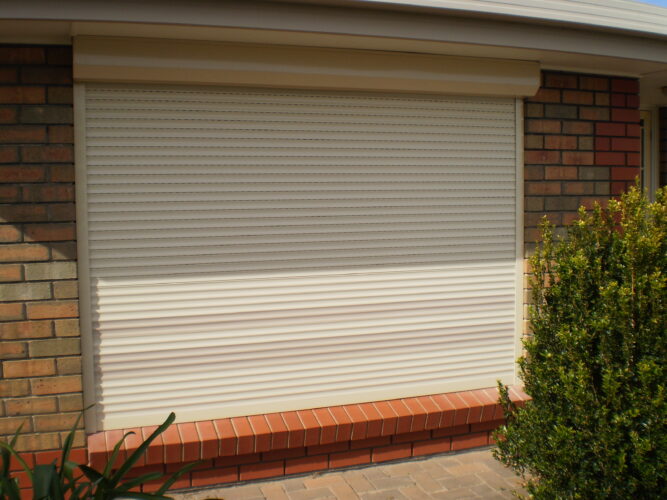
Roller shutters are the most common type in Adelaide homes and businesses. They consist of interlocking aluminium slats that roll up into a box housing above the window or door. You operate them manually (via a strap, crank, or spring mechanism) or with an electric motor. Zip track blinds and Zip screens are a related but distinct product, using a tensioned fabric guide system to keep the blind sealed against wind. Outdoor plantation shutters, made from timber or PVC, sit in a fixed frame and adjust via louvres rather than rolling. Security shutters use a heavier-gauge slat profile and are common on commercial shopfronts.
Each product has its own failure points. A roller shutter with a broken strap is a completely different outdoor shutter repair job from a Zip track blind with a damaged guide rail. Knowing your product type upfront saves time and prevents you from sourcing the wrong parts.
The most common faults
Most shutter problems fall into a predictable set of categories. Here are the faults you’re most likely to encounter, along with which type they typically affect:
| Fault | Most Likely Cause | Shutter Type Most Affected |
|---|---|---|
| Shutter won’t move up or down | Jammed slat, broken strap, or motor failure | All types |
| Slat is cracked or buckled | Physical impact or UV degradation | Roller shutters |
| Strap is frayed or snapped | Age, friction wear | Manual roller shutters |
| Motor hums but shutter doesn’t move | Worn drive gear or tripped limit switch | Motorised roller shutters |
| Remote not working | Dead battery, signal interference, or receiver fault | Motorised roller shutters |
| Shutter rattles in wind | Loose end caps, worn rubber seals, or misaligned guides | Roller shutters, Zip track |
| Track is bent or blocked | Impact damage or debris buildup | All types |
| Spring tension lost | Spring fatigue or incorrect initial tension setting | Spring-operated roller shutters |
| Fabric tears at the edges | Guide channel wear or UV brittleness | Zip track blinds |
A single cracked slat or a worn guide seal might seem minor, but left unaddressed, small faults put extra stress on neighbouring components and accelerate the overall deterioration of your shutter system.
Why Adelaide’s climate speeds things up
Adelaide’s extreme temperature swings are harder on roller shutters than most people realise. Summer heat causes aluminium components to expand, which puts pressure on tracks and end caps. UV radiation degrades rubber seals, PVC components, and fabric blinds faster than in cooler climates. Coastal areas like Glenelg and Henley Beach add salt air into the mix, which accelerates corrosion on metal parts and motor housings.
Wind is another factor. A shutter that was installed without correctly tensioned guides will rattle during strong gusts, which wears down the slat end locks over time. The good news is that most weather-related faults are gradual, which means catching them early gives you a chance to make a minor repair before it becomes a full replacement.
Understanding the fault category and your shutter type puts you in a much stronger position for everything that follows in this guide.
Step 1. Stay safe before you touch anything
Safety is the starting point for any outdoor shutter repair, regardless of how minor the fault looks. Roller shutters involve heavy aluminium components, spring tension, and in many cases, live electrical wiring. Treating every job as a potential hazard before you fully understand the problem is the right approach, not an overreaction.
Electrical hazards with motorised shutters
If your shutter has a motor, your first action is to cut power at the wall switch or isolate the circuit at your switchboard. Never assume a shutter is safe to touch just because it is not moving. A motor that hums or twitches under load is still live, and contact with live wiring can cause serious injury. If you are not a licensed electrician in South Australia, stop at the power isolation step and call a qualified technician for anything beyond that point. Opening a motor housing without proper training risks electric shock and will typically void the warranty on the unit.
If you are ever unsure whether a circuit is isolated, treat it as live. A non-contact voltage tester is an inexpensive and reliable tool that confirms isolation before you proceed.
Working safely at height
Shutter housings sit above window and door frames, which means accessing the box, the slat roll, or the spring mechanism almost always requires a ladder or step platform. Set your ladder on firm, level ground and have someone steady it from below if you are working alone. Avoid overreaching to either side, as most falls from ladders happen when people stretch beyond the ladder’s safe working zone. If the housing sits more than three metres off the ground, call a professional rather than risk a fall. Many older Adelaide homes have higher eave lines, which puts standard DIY access into genuinely dangerous territory.
Tools and PPE to have ready
Before you start, gather everything you need so you are not climbing up and down repeatedly. Having the right gear ready makes the whole job safer and more efficient from the first step. Here is a practical checklist:
- Safety glasses to protect against debris from tracks or slats
- Work gloves rated for metal handling, as slat edges can be sharp
- Non-contact voltage tester for motorised shutters
- Stable A-frame ladder rated to your weight plus tools
- Torch or headlamp for inspecting inside the box housing
- Masking tape to hold slats in position while you work
Running through this list before you climb takes two minutes and removes the most common causes of accidents during shutter repairs.
Step 2. Diagnose the problem without dismantling
Good diagnosis before any outdoor shutter repair saves you from pulling apart components that don’t need touching. Most shutter faults leave visible or audible clues that you can identify from the outside, which gives you a clear picture of what is actually wrong before you commit to any repair approach.
Check the visible components first
Start with a slow visual inspection from ground level before you get anywhere near a ladder. Look at the slats from the bottom up: are any bent, cracked, or sitting at an angle compared to the ones above and below them? Check the tracks on both sides for obvious bends, debris, or gaps where the slat end locks may have come free. End caps and rubber seals at the base of the shutter are often the first components to show wear, so inspect those closely too.
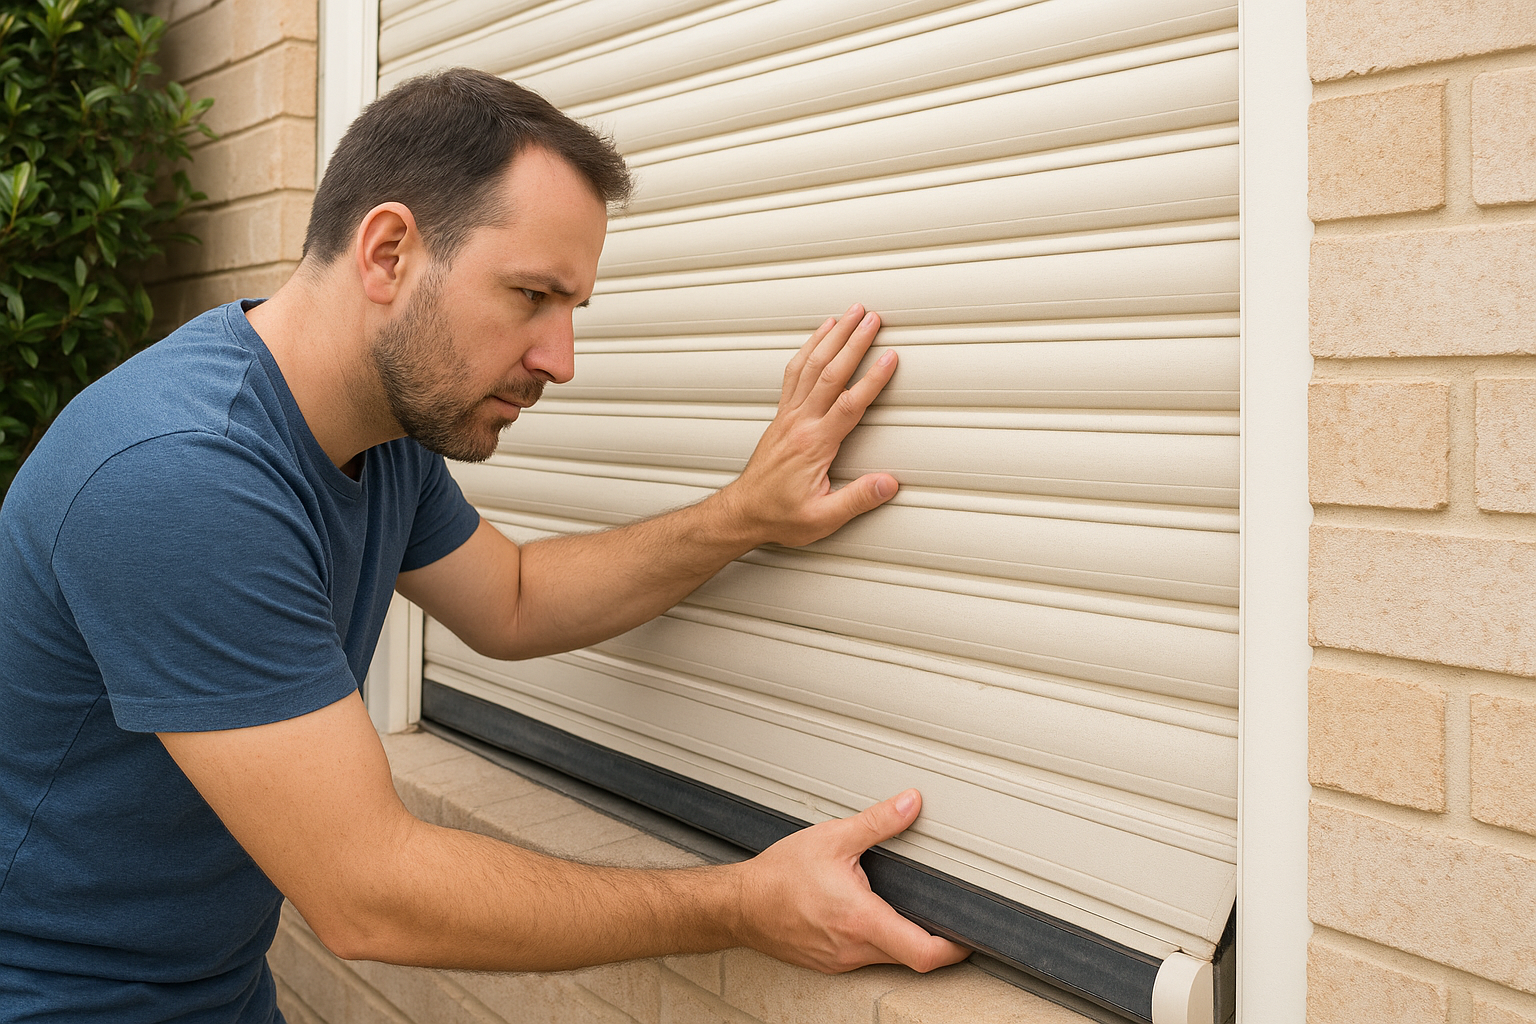
Move around to the side of the shutter and check the box housing for cracks in the cover or any slat material that has bunched rather than rolling cleanly. A shutter that has jammed mid-travel often shows visible compression or buckling near the roll point inside the box, which you can see through the housing gap without opening anything.
Listen and test before you open anything
After your visual check, operate the shutter slowly through its full range of motion while you listen. A grinding noise usually points to debris in the track or a slat that has come off its guide. A clicking sound on each rotation suggests a damaged slat end lock catching against the track wall. A motor that hums without movement indicates a drive gear or limit switch issue rather than a wiring fault.
Write down exactly what you observe: the fault symptom, where it appears in the travel range, and any sounds. This record is invaluable if you end up calling a technician, as it cuts their diagnosis time significantly.
Use this quick diagnostic template
Run through the following before moving to any hands-on work:
- Symptom: What is the shutter doing, or not doing?
- Location: Does the fault appear at a specific point in the travel range?
- Sound: Is there any grinding, clicking, or humming during operation?
- Visual fault: Can you see a cracked slat, bent track, or damaged seal?
- Last known change: Did the fault follow a storm, power outage, or physical impact?
Step 3. Clean, clear tracks, and lubricate correctly
Dirty or dry tracks are behind more outdoor shutter repair calls than most people expect. Grit, spider webs, dried rubber particles, and salt residue build up inside the guide channels over time, creating friction that puts unnecessary load on your slat end locks and motor. Before you replace any parts, a thorough clean and correct lubrication can resolve the fault entirely or at least confirm the issue sits elsewhere.
How to clean the tracks properly
Start by running the shutter to its fully open position so you have clear access to the entire length of both guide channels. Use a dry stiff-bristled brush, an old paintbrush works well, to dislodge loose debris from inside the channel. Work from the top of the track downward so debris falls clear of your work area rather than packing further into the channel.
Follow the brush with a damp cloth or sponge to remove the remaining grime. For salt residue, which is common in coastal Adelaide suburbs like Glenelg and Brighton, use warm water with a small amount of mild detergent. Rinse with clean water and allow the channel to dry fully before applying any lubricant. Applying lubricant over wet or dirty tracks just traps moisture against the metal and accelerates corrosion.
Never use a high-pressure hose to clean shutter tracks, as this forces water into the box housing and can damage the motor or cause the slat roll to swell.
Choosing the right lubricant
Lubrication type matters as much as the application itself. Silicone-based spray lubricant is the correct choice for aluminium tracks and PVC guide seals. It stays clean, does not attract dust, and does not degrade rubber components. Avoid WD-40 as a track lubricant; it is a water displacer and light solvent, not a long-term lubricant, and it breaks down rubber seals over time with repeated use.
Apply a thin, even coating of silicone lubricant along the full length of both tracks, then operate the shutter through its full travel range three or four times to distribute it evenly. Wipe away any excess that squeezes out from the channel edges. For spring-operated shutters, a light application to the spring housing pivot points also reduces friction and extends spring life.
Repeat this cleaning and lubrication process every six to twelve months, or after any extended period of strong winds or coastal exposure.
Step 4. Fix common manual shutter problems
Manual shutters have fewer components to fail than motorised ones, which makes many of their common faults genuinely fixable at home. Once your tracks are clean and lubricated, the next step in any outdoor shutter repair is to identify whether the fault sits in the strap, the slat, or the spring mechanism, and then work through each fix in a logical order.
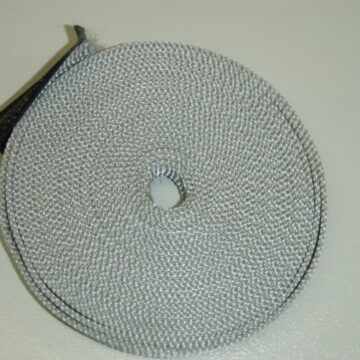
Replace a worn or snapped strap
A frayed or broken pull strap is the most common manual shutter fault in Australian homes, particularly on shutters more than five years old. To replace it, first run the shutter to the closed position so there is no tension on the mechanism. Feed the new strap up through the guide barrel inside the box housing, thread it through the strap clamp or winding drum, and tie a secure knot before trimming the excess. Pull the shutter to its fully open position to confirm the new strap seats correctly without slipping.
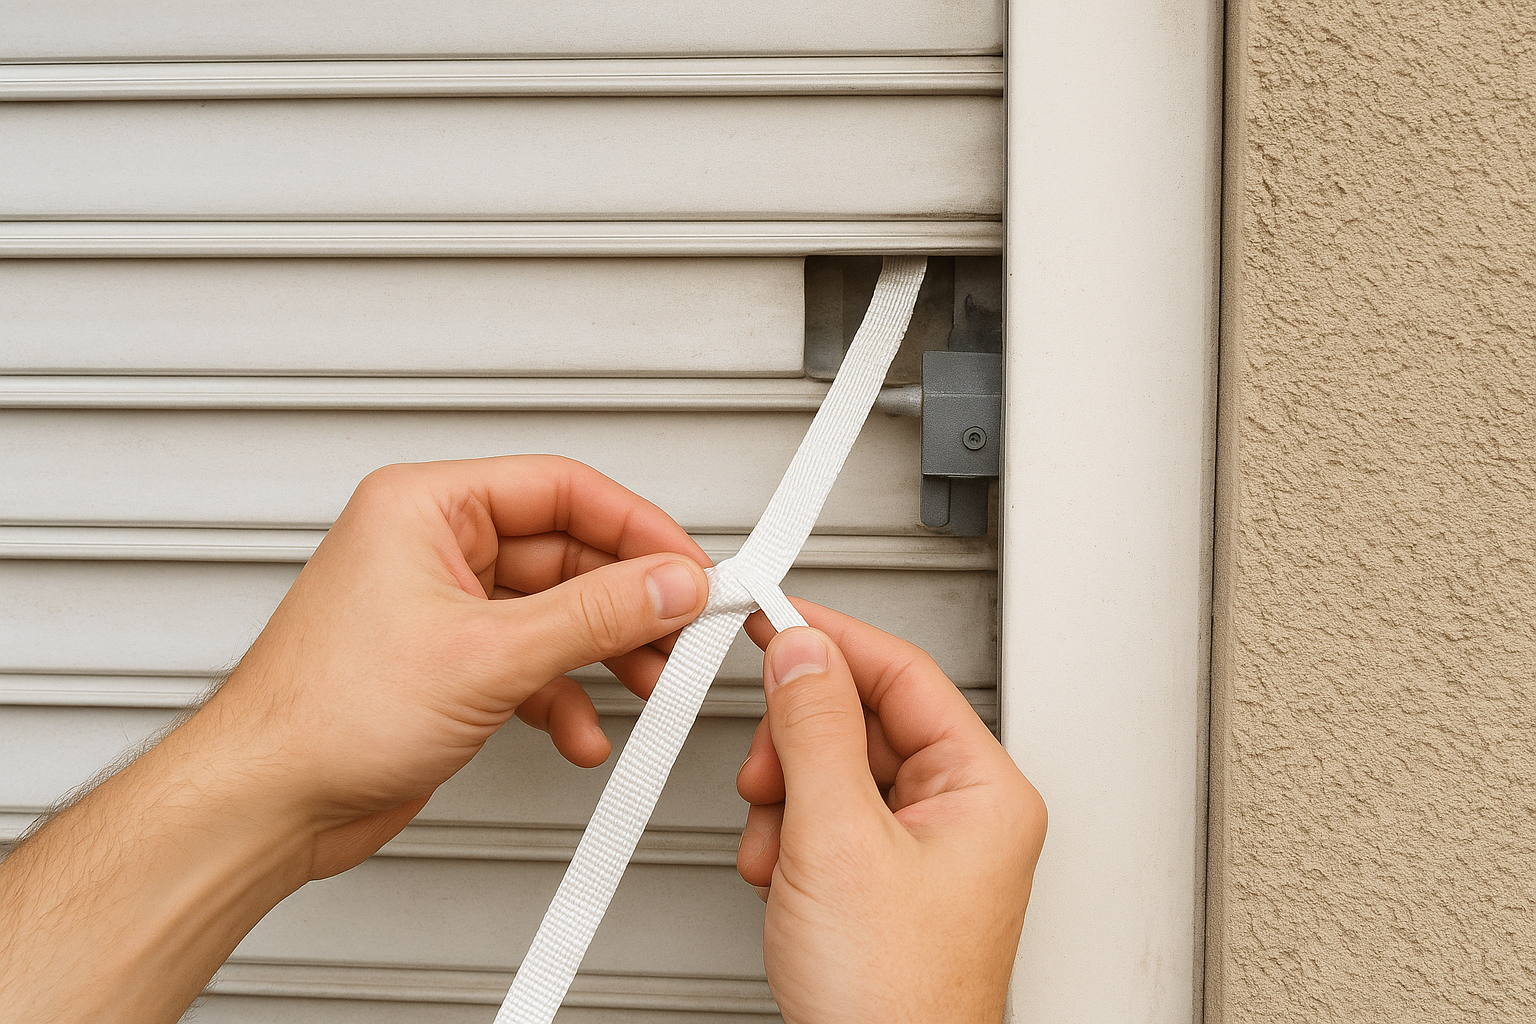
Buy a replacement strap that matches the original width and material exactly; a mismatched strap will wear the barrel channel unevenly and fail sooner.
Straps come in standard widths of 14mm, 20mm, and 23mm. Check your existing strap for a width stamp near the clamp, or measure the channel width directly with a ruler before purchasing so you get the right size first time.
Free a jammed or buckled slat
A single buckled slat is usually the result of physical impact, such as a branch or hailstone strike, or a slat that has come off its guide and folded under pressure. Lower the shutter completely and locate the damaged slat by running your hand along the face until you feel the deformation. Slat end locks, the small plastic clips at each end, often pop free during a jam and you can reseat them by pressing firmly back into the slat end and re-engaging them with the guide track.
If the slat body itself is cracked or bent, you need to replace that individual slat. Slide the intact slats above it upward to create enough clearance, unhook the damaged slat from its interlocking edges, and slot the replacement in from the side. Classic Roller Shutters stocks individual replacement slats and end locks for most standard profiles, so you do not need to replace the entire curtain for a single damaged section.
Step 5. Troubleshoot motorised shutters safely
Motorised shutters add real convenience, but when they stop working, the fault can sit in several different places: the power supply, the remote receiver, the limit switches, or the motor itself. Systematic troubleshooting works from the simplest possible cause toward the more complex ones, saving you time and money on parts you may not need. For any outdoor shutter repair involving motor components, always confirm power is isolated before touching any wiring, as covered in Step 1.
Check power supply and remote first
The most common motorised shutter fault is also the easiest to fix. Dead batteries in the remote handset are behind a significant number of service calls that need nothing more than a fresh battery. Replace the remote battery first, then test. If the shutter still does not respond, check the wall switch and mains power at your switchboard to confirm the circuit has not tripped.
If your remote works inconsistently rather than not at all, interference from nearby wireless devices such as Wi-Fi routers or garage door openers is often the cause; try operating the shutter from close range to confirm signal reach.
Some motors also carry a manual override cord inside the housing that lets you move the shutter by hand during a power outage. Check your motor’s product documentation for the location of this cord before assuming the system is fully locked down.
Identify motor and limit switch faults
A motor that hums but produces no movement points to either a tripped limit switch or a worn drive gear. Limit switches are the internal stops that tell the motor where the fully open and fully closed positions are. Over time, they drift out of calibration, causing the motor to cut out early or refuse to engage at all.
Most modern tubular motors have an external limit switch adjustment point, usually a small recessed dial at the motor end cap, accessible without opening the housing. Consult your motor’s manual for the exact adjustment sequence, as the steps vary between brands and models.
Know when to stop and call a professional
If you have confirmed power, replaced the remote battery, and adjusted the limit switches without resolving the fault, the motor drive gear or internal wiring is likely the cause. Opening a motor housing without formal electrical training puts you at genuine risk and voids most manufacturer warranties. At this point, contact a licensed technician who carries replacement motors for common brands, as a direct swap-out is usually faster and cheaper than a lengthy internal diagnostic.
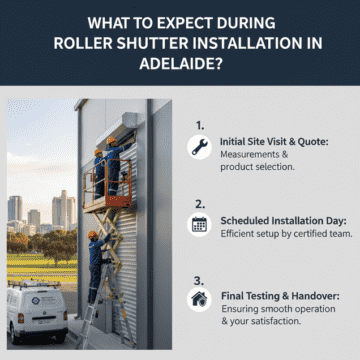
Costs, parts, and what affects the final price
Understanding what an outdoor shutter repair costs before you call anyone puts you in a stronger position. Repair pricing in Adelaide varies considerably depending on the fault type, whether parts are needed, and how accessible the shutter is. Having realistic numbers in mind stops you from being caught off-guard when a quote arrives.
T
What drives the price up or down
Access difficulty is the single biggest variable in any repair quote. A shutter mounted above a double-storey window costs more to reach than one at ground level, because the technician needs additional equipment and time. Similarly, older or imported shutter brands sometimes require non-standard parts that carry a premium or need to be ordered in, which adds both cost and waiting time to the job.
Catching faults early consistently produces cheaper repairs. A worn strap addressed at the first sign of fraying costs far less than the structural damage caused when a shutter drops suddenly because the strap snapped under full load.
Sourcing parts yourself to reduce costs
If you are confident in your ability to carry out the physical repair, buying parts directly from a local supplier cuts the labour cost out entirely. Classic Roller Shutters stocks replacement slats, straps, end locks, seals, and motor components from their Adelaide factory, which means you get the right part without the freight delay of ordering online. Confirm the exact profile and width of your existing components before purchasing to avoid returns. Bringing in a short section of your original strap or an end lock as a physical reference is the most reliable way to match parts correctly.
Next steps
You now have a clear framework for tackling outdoor shutter repair at home and knowing exactly when to hand the job to a professional. Start with a thorough visual inspection, clean and lubricate your tracks, and work through the fault systematically before ordering any parts. Most common faults, including worn straps, jammed slats, and limit switch drift, respond well to methodical diagnosis and the right replacement components.
If your inspection reveals a motor fault, structural damage, or anything involving live electrical components, stop and call a licensed technician rather than risk making the problem worse. The repair costs outlined in this guide give you a solid benchmark for assessing any quote you receive.
Classic Roller Shutters Adelaide services all brands of roller shutters across Adelaide and stocks genuine replacement parts directly from our factory. Book a free assessment or pick up the parts you need by visiting Classic Roller Shutters Adelaide today.